


Are you an iPhone user looking to take your photography skills to the next level?
Well, look no further than the built-in blur tool on your iPhone. This powerful feature allows you to add depth and focus to your photos, creating stunning effects that will impress your friends and family.
Whether you’re a beginner or an experienced photographer, mastering the blur tool on iPhone can take your images to new heights. In this article, we’ll share some tips and tricks to help you make the most of this versatile tool.
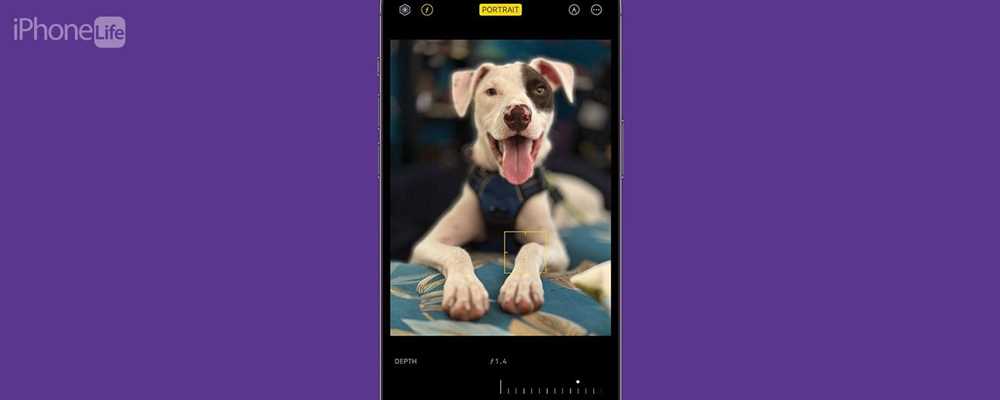
First, it’s important to understand the different types of blur available on your iPhone. The Portrait mode allows you to blur the background of your photos, creating a professional-looking depth of field effect. On the other hand, the Gaussian blur tool allows you to selectively blur specific areas of your image, highlighting the subject and creating a sense of movement.
Once you’ve familiarized yourself with the different types of blur, it’s time to start experimenting. Try using the blur tool to draw attention to specific elements in your photos, such as a person’s face or a beautiful flower. You can also use it to create artistic effects, like blurring the edges of a landscape photo to give it a dreamy, ethereal look.
Remember, practice makes perfect. The more you use the blur tool on your iPhone, the better you’ll become at controlling and manipulating the effect. So grab your iPhone, head outdoors, and start capturing breathtaking images with the help of the blur tool.
Understanding the Basics
The Blur tool is a powerful feature on iPhone that can be used to enhance your photos by adding depth and focus. Whether you want to create a soft and dreamy effect or highlight specific details in your image, mastering the Blur tool is a must.
Here are some tips to get you started:
1. Accessing the Blur tool:
To access the Blur tool on iPhone, open the Photos app and select the image you want to edit. Tap on the “Edit” button and then choose the “Adjustments” option. From there, you can find the Blur tool and start applying it to your photo.
2. Adjusting the strength:
The Blur tool allows you to control the strength of the blur effect. You can adjust the intensity by sliding the bar left or right. Experiment with different levels to find the perfect balance for your image.
3. Applying the blur:
To apply the blur effect, simply drag your finger over the areas of the photo that you want to blur. You can use your finger to create a sharp focus on certain objects or blur the entire background for a more artistic look.
4. Using the brush size:
The Blur tool offers options to adjust the brush size. This allows for precise editing and helps you create a more realistic blur effect. Use a smaller brush size for intricate details and a larger one for broader areas.
5. Undo and redo:
If you make a mistake or want to make changes to the blur effect, don’t worry! iPhone’s editing tools allow you to undo or redo any changes you’ve made. Simply tap on the backward or forward arrow buttons to adjust the blur effect accordingly.
By understanding the basics of the Blur tool and utilizing these tips, you’ll be well on your way to mastering the art of creating stunning blur effects on iPhone.
Getting Started with the Blur Tool
The blur tool is a powerful feature on the iPhone that allows you to create stunning effects and enhance the overall appearance of your photos. By mastering this tool, you can take your iPhone photography to the next level. In this guide, we will provide you with valuable tips and tricks to help you get started with the blur tool on your iPhone.
- Open the photo you want to edit using your iPhone’s built-in Photos app.
- Tap on the “Edit” button located at the top right corner of the screen.
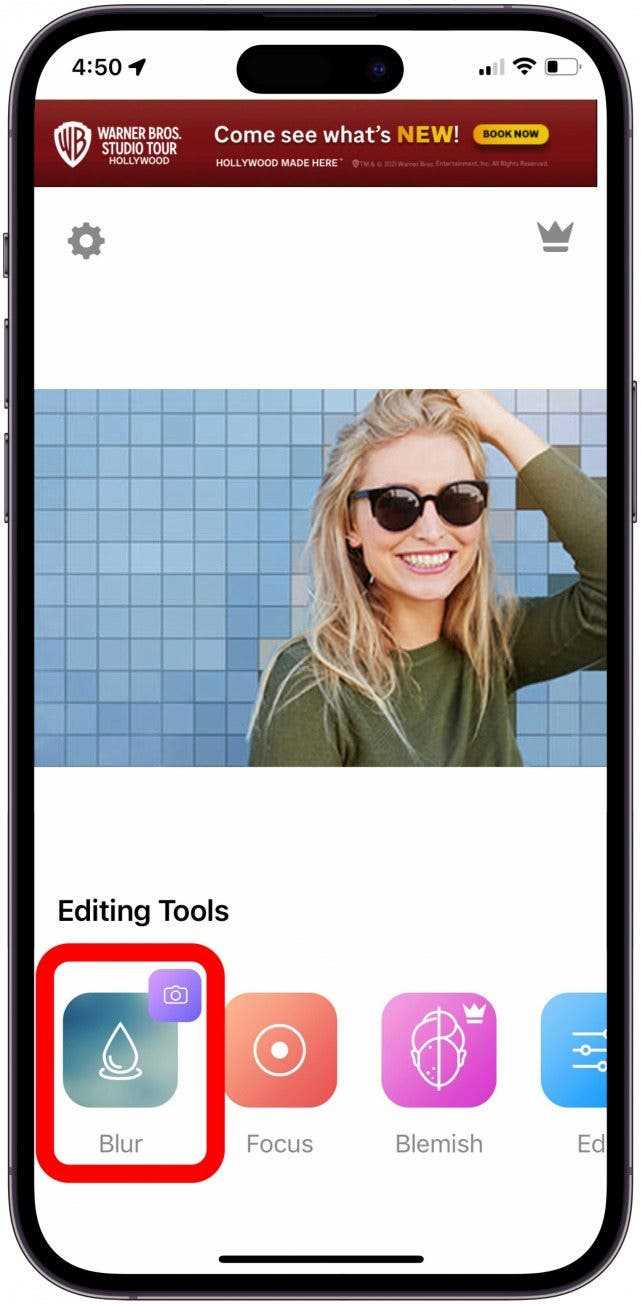
- Once in editing mode, you will see a variety of editing tools at the bottom of the screen. Swipe left until you find the “Blur” tool.
- Tap on the “Blur” tool to activate it.
- You can choose from different types of blur effects such as “Radial,” “Linear,” or “Motion.” Select the effect that best suits your photo.
- Adjust the intensity of the blur by dragging the slider left or right.
- Tap and drag on the area of the photo where you want to apply the blur effect.
- If you want to undo or redo any changes, tap on the “Undo” or “Redo” button located at the top left corner of the screen.
- Once you are satisfied with the result, tap on the “Done” button to save your edited photo.
With these simple steps, you can easily get started with the blur tool on your iPhone. Experiment with different blur effects and intensities to create unique and visually appealing photos. Mastering this tool will allow you to add depth and focus to your images, transforming them into true works of art.
Adjusting the Strength of the Blur Effect
Mastering the Blur tool on your iPhone can enhance your photos and give them a professional touch. One of the key tips and tricks for using this tool effectively is adjusting the strength of the blur effect to achieve the desired result.
The blur tool on the iPhone allows you to selectively blur parts of your image, adding depth and focus to your photos. By controlling the strength of the blur effect, you can create a subtle or dramatic blur, depending on your artistic vision.
To adjust the strength of the blur effect on your iPhone, follow these simple steps:
- Open the photo you want to edit in the Photos app.
- Tap on the “Edit” button at the top right corner of the screen.
- Look for the three overlapping circles icon, which represents the Effects tool, and tap on it.
- Select the “Blur” option from the list of effects.
- Now, you can adjust the strength of the blur effect by dragging the slider left or right.
- Preview the changes and make any additional adjustments if needed.
- Once you’re satisfied with the blur effect, tap on “Done” to save your edited photo.
By experimenting with different levels of blur strength, you can create a range of artistic effects. A light blur can add a soft and dreamy ambiance to your photos, while a strong blur can create a more dramatic and abstract look.
Keep in mind that the blur tool is not limited to just portraits or close-up shots. You can also use it to blur backgrounds, emphasizing the subject of your photo and creating a professional-looking image.
Remember to practice and experiment with the blur tool to find the perfect balance and enhance your photos to their full potential.
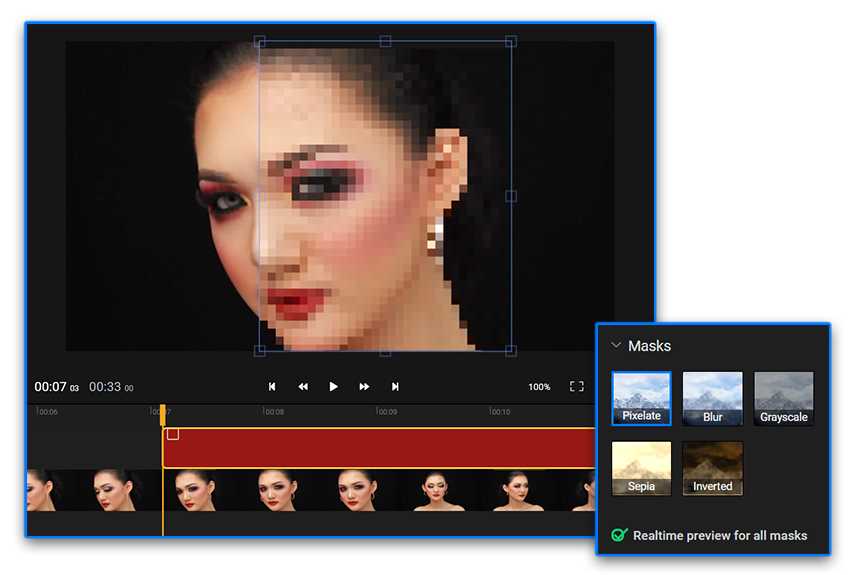
Selective Blurring with the Brush Tool
When it comes to mastering the blur tool on iPhone, one of the most useful tips and tricks is to utilize the brush tool for selective blurring. This tool allows you to apply blur effects only to specific areas of your photo, giving you more control over the final result.
To use the brush tool for selective blurring, simply open the blur tool in your photo editing app and select the brush option. Then, choose the size and intensity of the brush that you want to use. You can adjust these settings based on the level of blur you want to apply and the size of the area you need to blur.
With the brush tool selected, you can now start painting over the areas that you want to blur. Take your time and be precise, ensuring that you apply the blur effect only where you want it. This selective blurring technique is particularly useful when you want to blur the background of a photo while keeping the subject in focus, or when you want to create depth and dimension within your image.
As you work with the brush tool, remember that you can always undo or adjust your brush strokes if needed. Most photo editing apps provide options for erasing or refining the brush strokes, allowing you to make precise edits and obtain the desired blur effect.
By mastering the selective blurring technique with the brush tool, you can take your iPhone photography to the next level. Experiment with different brush sizes and intensities to achieve the desired effect in your photos. Remember, practice makes perfect, so don’t hesitate to keep exploring and experimenting with the blur tool and its various settings!
Advanced Techniques
Once you have mastered the basics of the Blur tool on iPhone, there are several advanced techniques you can use to take your editing to the next level.
1. Precise Selection: When using the Blur tool, you can make more precise selections by using your finger to zoom in on the area you want to blur. This will allow you to apply the blur effect with greater accuracy.
2. Variable Blur Strength: Experiment with different blur strengths to achieve the desired effect. You can adjust the strength of the blur by lightly tapping or swiping on the area you want to blur. This will give you more control over the intensity of the blur.
3. Layering Effects: Combine the Blur tool with other editing tools on iPhone, such as the adjustment tools or filters, to create unique and interesting effects. For example, you can apply a subtle blur to a portrait and then use the adjustment tools to enhance the colors or contrast.
4. Non-Destructive Editing: Take advantage of non-destructive editing features on your iPhone to preserve the original photo while experimenting with different blur effects. This way, you can easily revert back to the original image if you’re not satisfied with the changes.
5. Creative Blurring: Don’t limit yourself to using the Blur tool only for its traditional purpose. Get creative and use it to add depth, highlight certain elements, or create a dreamy atmosphere in your photos. Remember, the Blur tool is a versatile tool that can be used in many different ways.
By mastering these advanced techniques, you can take full advantage of the Blur tool on your iPhone and create stunning and unique images that stand out from the crowd.
Creating a Tilt-Shift Effect
The blur tool is not just limited to blurring the entire image; it can also be used to create a tilt-shift effect. With this effect, you can simulate a shallow depth of field and make certain parts of your image appear in focus while the rest is blurred. This can give your photos a unique and artistic look.
To create a tilt-shift effect using the blur tool on your iPhone, follow these tips:
- Choose an image with a scene that would benefit from the tilt-shift effect. This could be a landscape, a cityscape, or any scene with distinct lines and details.
- Open the photo in the blur tool on your iPhone. You can access this tool by selecting the edit option in your photos app and then choosing the blur tool.
- Select the circular blur option from the toolbar at the bottom of the screen. This will allow you to create circular blur areas on your image.
- Place your finger on the photo and move it up or down to adjust the size of the circular blur area. The area inside the circle will be in focus, while the surrounding area will be blurred.
- Move the circle to the desired location on your image. You can repeat this step multiple times to create multiple focused areas in your image.
- Adjust the intensity of the blur using the slider at the bottom of the screen. This will determine how blurry the surrounding areas will appear.
- Once you are satisfied with the tilt-shift effect, save your image or share it directly from the photos app.
By mastering the blur tool on your iPhone and experimenting with different settings, you can create stunning tilt-shift effects that will make your photos stand out.
Blurring Backgrounds for Portraits
Mastering the blur tool on your iPhone can help you take stunning portraits with professional-looking blurred backgrounds. With just a few tips and tricks, you can easily blur the background and make your subject stand out.
Here are some steps to follow:
- Start by opening the photo you want to edit on your iPhone.
- Tap on the Edit button and select the Blur tool.
- Adjust the intensity of the blur by sliding your finger up or down on the screen.
- Use your finger to paint over the areas you want to blur. This could be the background or any distracting elements.
- Make sure to be careful and precise around the edges of your subject for the best results.
- Continue to adjust the intensity and refine the blur until you’re satisfied with the final result.
- Save the edited photo and share it with others to show off your photography skills.
By mastering the blur tool on your iPhone, you can easily create stunning portraits with beautifully blurred backgrounds. Experiment with different intensities and compositions to achieve the desired effect. Whether you’re a professional photographer or just an enthusiast, these tips will surely help you take your iPhone photography to the next level.
Applying Motion Blur to Action Shots
The Blur Tool on iPhone is a powerful feature that can enhance the look of action shots by adding a sense of movement to a still image. By using this tool, you can make your action shots appear dynamic and exciting, as if they were captured in the middle of the action.
Here are some tips and tricks for mastering the Blur Tool on iPhone:
- Open the image you want to apply motion blur to in your photo editing app.
- Select the Blur Tool from the toolbar.
- Adjust the size and strength of the brush according to your preference.
- Paint over the areas where you want to apply motion blur. This could be the moving subject or any parts of the image that you want to add a sense of movement to.
- Experiment with different brush sizes and strengths to achieve the desired effect. You can always undo or adjust the blur if needed.
- Once you’re satisfied with the result, save the edited image.
By following these tips and tricks, you can take your action shots to the next level and impress your friends and followers with dynamic and eye-catching images.
What is the Blur Tool on the iPhone?
The Blur Tool on the iPhone is a feature that allows users to blur or soften specific parts of a photo. It can be used to create a selective focus effect, highlight a certain area, or add depth to an image.
How do I access the Blur Tool on my iPhone?
To access the Blur Tool on your iPhone, open the Photos app and select the photo you want to edit. Tap on the Edit button at the top right corner of the screen and then tap on the three dots icon (…) at the bottom right. From the options that appear, choose “Markup” and then tap on the Blur icon, which looks like a droplet-shaped brush.
Can I control the intensity of the blur with the Blur Tool on iPhone?
Yes, you can control the intensity of the blur with the Blur Tool on iPhone. After selecting the Blur Tool, you can adjust the size of the brush using the slider at the bottom. The larger the brush, the more area it will cover with the blur effect. Additionally, you can adjust the strength of the blur by using the slider on the right side of the screen. Sliding it to the left will decrease the blur, while sliding it to the right will increase the blur.
+ There are no comments
Add yours