


Photography is a powerful art form that allows us to capture moments and express our creativity. With the advancements in technology, editing software like GIMP and Photoshop have made it easier than ever to enhance and manipulate photos. One popular technique that can add depth and a sense of mystery to your images is blurring. In this article, we will explore the art of blurring PNG photos and share some tips and tricks to help you achieve stunning results.
One of the advantages of working with PNG photos is the ability to preserve transparency. This means you can blur specific areas of an image while keeping other parts sharp and in focus. By using layers and masks, you can control the opacity and blending modes of the blur effect, allowing you to create a soft and smooth transition between blurred and sharp areas.
When it comes to blurring, there are various filters and techniques you can use to achieve different effects. Gaussian blur is a commonly used filter that produces a subtle and natural-looking blur. You can adjust the blur radius to control the level of blurriness, giving your photos a dreamy and ethereal quality. Another technique is to use the smudge tool to gently soften edges and blend colors, creating a painterly effect.
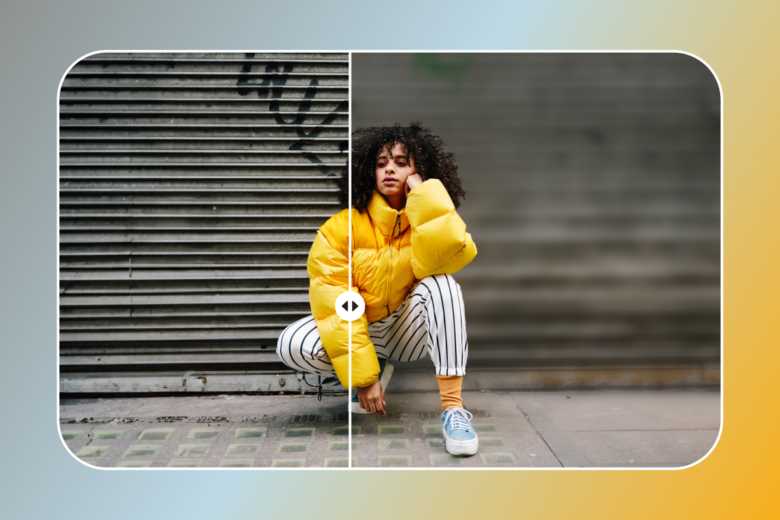
Blurring can be especially effective when applied to certain elements in a photo. For example, you can blur the background to make the subject stand out or add depth to a landscape. You can also use blurring to enhance shadows and highlight certain areas, creating a sense of depth and dimension. Experiment with different blur techniques and settings to find the style that best suits your photo and artistic vision.
Understanding Blurring in PNG Photos
Blurring is a common technique used in photo editing software to manipulate and enhance images. When it comes to PNG photos, understanding how blurring works can help you achieve the desired effects and create stunning images.
PNG (Portable Network Graphics) is a popular image format known for its support of transparency and lossless compression. Blurring in PNG photos involves modifying the pixels’ colors and positions to create a smooth and soft appearance. This manipulation of pixels helps to reduce sharpness and minimize unwanted details, resulting in a more visually pleasing image.
One of the most popular software programs used for blurring and editing photos is Adobe Photoshop. It offers a variety of blur filters and techniques that can be applied to PNG images. By adjusting the blur filter settings, such as radius and intensity, you can control the level of blurring applied to your photos.
When blurring PNG photos, it’s important to consider the resolution of the image. Blurring works best on high-resolution photos, as it maintains more details and produces a smoother effect. Lower resolution images may result in a blurry appearance, leading to loss of clarity and definition.
To achieve the desired blurring effect, you can also merge multiple layers of your PNG photo. By applying different levels of blurring to each layer and adjusting their opacity, you can create depth and highlight specific areas within the image.
Another technique to consider is using art-based blurring tools. Programs like GIMP offer tools like smudge brushes, which can be utilized to soften edges, smooth gradients, and add subtle blurring effects to your photos. These tools are especially useful when working with images that contain sharp details or need to imitate traditional art styles.
Blurring in PNG photos can be used to remove distractions, enhance focus on the main subject, or create dreamy and ethereal effects. By adjusting the contrast between blurred and sharp areas, you can add depth and visual interest to your images. This contrast also helps to create a sense of distance by adding shadows and highlights to different layers of blurring.
Overall, understanding how blurring works in PNG photos is essential for anyone looking to create professional and visually appealing images. By experimenting with different blurring techniques, adjusting filters, and understanding the effects of resolution and layer manipulation, you can take your photo editing skills to new heights.
Remember, blurring is just one of the many techniques available to enhance your photos. Don’t be afraid to explore other effects and tricks to bring out the best in your images.
Why Blurring Can Enhance Your PNG Photos

Blurring techniques can greatly enhance the overall appearance and impact of your PNG photos. By selectively blurring certain areas, you can draw attention to the subject of the photo while softening distracting elements.
The transparency and opacity of PNG files make them ideal for merging different layers of images and applying various effects, including blurring. This allows you to easily experiment with different levels of blurring and find the perfect balance.
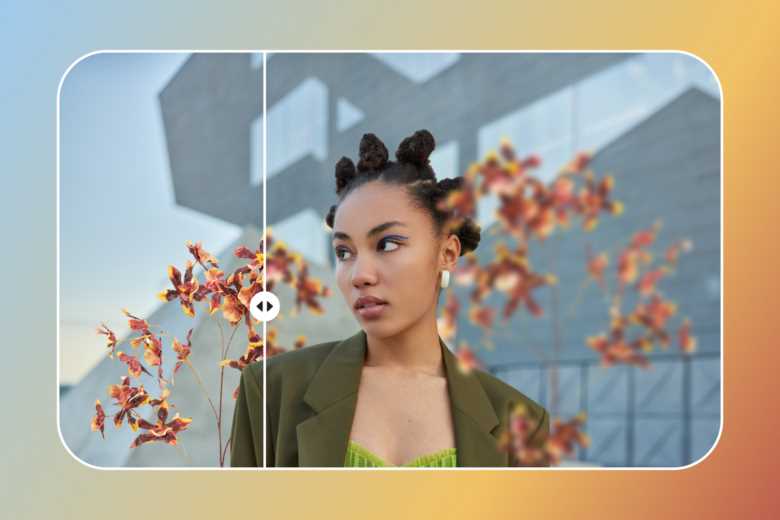
Blurring can be particularly effective in enhancing contrast and resolution in photography. By blurring the background or certain parts of the photo, you can make the main subject stand out and create a more visually appealing composition.
Moreover, blurring can be used as a creative art form. By employing different blurring tricks and techniques, you can add depth, shadows, and highlights to your photos, giving them a unique and artistic touch.
There are various software tools available, such as GIMP and Photoshop, that offer a wide range of filters and options for blurring. These tools allow you to control the level of blurring, adjust the pixel size, smudge edges, and highlight specific areas, giving you more flexibility in your editing and manipulation process.
Blurring can also help soften certain elements in the photo, such as skin imperfections or harsh edges, making the image appear smoother and more visually appealing. It can also be used to sharpen specific details or add a dreamy and ethereal effect to the photo.
In conclusion, blurring techniques can greatly enhance your PNG photos by adding depth, creating contrast, and drawing attention to the main subject. Whether you’re looking to improve your photography skills or add an artistic touch to your images, experimenting with different blurring techniques can bring your photos to life.
Different Types of Blurring Techniques
When it comes to editing photos, the blurring effect can be a powerful tool. Blurring helps to soften the edges of an image and create a more artistic look. There are several different techniques to achieve this effect, each with its own unique characteristics and usage.
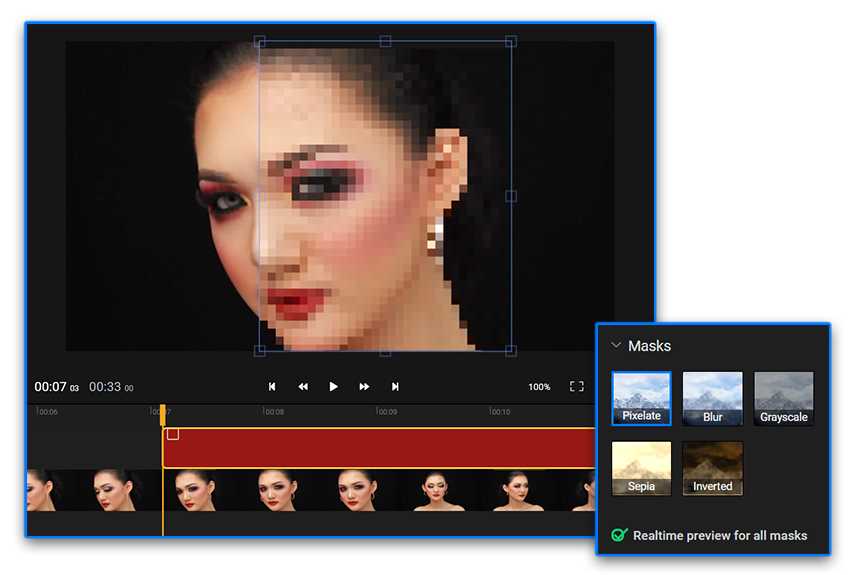
One commonly used blurring technique is pixel blur. This technique involves reducing the resolution of the photo, which effectively blurs the image as individual pixels become less distinct. This can be useful for creating a soft, dream-like effect or for hiding imperfections in the photo.
Another popular technique is gaussian blur. This involves applying a gaussian filter to the image, which blurs the image by averaging the color values of neighboring pixels. This technique is great for creating a smooth, gradient effect or for adding a subtle blur to backgrounds.
Smudge blur is another technique that can be used to create a softening effect. This technique involves using a smudge tool to blend and manipulate the colors and edges of the image. It can be used to create a smooth transition between different elements in the photo or to create a painterly effect.
Adding transparency can also be a way to achieve a blurring effect. By reducing the opacity of certain layers or elements in the photo, you can create a hazy, blurred look. This technique is often used to highlight a specific subject or to create a sense of depth and dimension.
Software such as Photoshop and GIMP offer a wide range of blurring filters and tools that can help you achieve the desired effect. Experimenting with different techniques and combining them can result in unique and captivating blurring effects in your photos. Remember to keep the overall composition, contrast, and artistry in mind when applying blurring techniques to ensure the final result is visually pleasing.
Mastering the Art of Blurring PNG Photos
Blurring PNG photos can add a touch of artistry to your images, whether you’re editing them for personal use or professional photography projects. Mastering the technique of blurring can help you enhance certain aspects of your photos, create depth and focus, and evoke different emotions in your viewers.
There are various techniques you can use to blur PNG photos, depending on the desired effect and the editing software you’re using. Here are some tips and tricks to help you get started:
- Opacity and Filters: Adjust the opacity of certain layers or apply filters to create a translucent effect, allowing your image to blend seamlessly with the background.
- Shadows and Highlights: Play with shadows and highlights to add depth and dimension to your image, emphasizing important areas and bringing attention to specific details.
- Pixel Editing: Manipulate individual pixels to create a unique and artistic blurring effect. Experiment with different pixel manipulation techniques to achieve the desired result.
- Transparency and Contrast: Experiment with transparency and contrast adjustments to achieve a balance between the blurred and sharp areas of your photo. This can help create a more dynamic and visually appealing image.
- Software Tools: Utilize software tools such as GIMP or Photoshop to access a wide range of blurring effects. These programs offer various brushes and filters that can help you achieve the desired blurring effect.
- Smoothing and Smudging: Use the smooth or smudge tools to blend edges and create a softer, more realistic transition between blurred and sharp areas.
- Effects and Blur Techniques: Experiment with different blur techniques, including Gaussian blur, motion blur, or radial blur, to achieve different artistic effects and levels of blurring.
- Resolution and Sharpening: Adjust the resolution of your image and apply sharpening techniques selectively to areas that need more focus, creating a balanced and visually pleasing result.
- Merge and Layering: Combine multiple layers with different blurring effects and opacity levels to create a complex and visually captivating image.
By mastering the art of blurring PNG photos, you can add a creative touch to your photography and create images that evoke specific emotions and captivate your viewers. With the right techniques and software tools, you can achieve impressive results and enhance the overall quality of your work.
Remember to experiment, practice, and develop your own unique style when it comes to blurring photos. The more you explore and learn, the better you’ll become at creating captivating and artistic images.
Choosing the Right Blurring Tool
When it comes to blurring photos, choosing the right software tool can make a big difference in achieving the desired effects. There are several options available, each with its own unique set of features and techniques.
GIMP: GIMP is a popular open-source editing software that offers a wide range of tools for blurring photos. It allows you to adjust the contrast, apply various effects, and manipulate the transparency and resolution of your images. With GIMP, you can create intricate blurring effects by using different layers and filters.
Photoshop: Photoshop is another widely used software for photo editing and manipulation. It provides advanced blurring tools such as the “Blur” and “Sharpen” filters, which allow you to soften or sharpen specific areas of your photos. With Photoshop, you can also adjust the opacity and blend modes of your blurring effects to create smooth transitions.
Pixelmator: Pixelmator is a powerful image editing software designed specifically for macOS. It offers a variety of blurring techniques, including the ability to soften shadows and highlight specific areas of your photos. With Pixelmator, you can easily merge multiple layers together to create sophisticated blurring effects.
Smudge Tool: Most photo editing software, including GIMP and Photoshop, comes with a smudge tool. This tool allows you to manually blur and blend colors together, giving your photos a more artistic and painterly look. The smudge tool is particularly useful for creating subtle blurring effects or adding texture to certain areas of your images.
When choosing a blurring tool, consider your specific needs and the level of control you require. Experiment with different software options to find the one that best suits your style and preferences. Remember, the art of blurring photos is about finding the right balance between softening and maintaining the integrity of your images.
With the right blurring tool and a bit of practice, you can elevate your photography to a new level of artistry.
Understanding the Impact of Blurring Settings
Blurring is a crucial technique in photo editing, and understanding the impact of different blurring settings can greatly enhance your ability to create stunning visuals. Whether you are using Photoshop, GIMP, or any other photo editing software, being familiar with the various blurring effects and how they affect your PNG photos is essential.
The primary purpose of blurring is to soften the image and reduce its level of detail. By manipulating the pixel values, blurring can create a sense of depth, smooth out imperfections, and even add an artistic touch to your photos.
One of the key factors to consider when using blurring techniques is the resolution of your image. Higher-resolution photos tend to have more detail, and blurring such images requires carefully selecting the appropriate blurring filters and settings. Experimenting with different settings can help you achieve the desired level of softness without compromising the overall clarity of the image.
Another important consideration is the transparency and layers within your PNG files. Blurring can affect the visibility of underlying layers and the transparency of certain elements, such as shadows or highlights. It’s crucial to carefully merge and adjust the opacity of different layers to ensure the desired blurring effect without losing important details.
When applying blurring effects, it’s essential to choose the right type of blur for the desired outcome. Gaussian blur, for example, is commonly used to create a smooth transition between different elements of an image, while motion blur can add a sense of movement. Experimenting with different types of blurs and their settings can help you achieve the desired visual impact.
Keep in mind that blurring is just one of many photo manipulation techniques. Combining blurring with other editing techniques, such as sharpening or smudging, can further enhance your images and create unique visual effects.
Understanding the impact of blurring settings is crucial for photographers and artists alike. By mastering the different blurring techniques and being aware of how they affect your photos, you can unleash your creativity and bring your artistic vision to life.
Remember, practice and experimentation are key to becoming proficient in blurring and other editing techniques. Don’t be afraid to try new settings and push the boundaries of your creativity to achieve stunning and impactful results.
How do I blur a PNG photo?
To blur a PNG photo, you can use photo editing software such as Photoshop or GIMP. Open the PNG file in the software, select the area you want to blur, and apply a blur filter to it. You can adjust the level of blur to your liking.
What are some tips for blurring PNG photos?
When blurring PNG photos, there are several tips you can keep in mind. Firstly, make sure to work on a copy of the original photo to avoid any permanent changes. Secondly, use a feather or gradient tool to create a gradual blur effect. This can make the blurred area blend more naturally with the rest of the photo. Lastly, try different blur filters and adjust their parameters to achieve the desired effect.
Are there any tricks for blurring specific parts of a PNG photo?
Yes, there are tricks for blurring specific parts of a PNG photo. One trick is to use selection tools or masks to isolate the area you want to blur. This allows you to apply the blur effect only to the selected area, while keeping the rest of the photo sharp. Another trick is to use layering techniques, where you duplicate the layer, apply the blur effect to the duplicate layer, and then use erasing or masking tools to reveal the sharp areas beneath. These tricks give you more control over the blurring process and help you achieve the desired result.


+ There are no comments
Add yours