


In today’s fast-paced web environment, optimizing the performance of your website is crucial. One important factor that affects the loading times of web pages is the file size of images. PNGs with blur box effects, although visually appealing, can often result in large file sizes and consequently slower loading times. In this article, we will explore methods to optimize and compress blur box PNGs, reducing their file size without sacrificing image quality or transparency.
A common approach to compressing PNGs is to use lossy compression, which reduces file size by removing unnecessary data and introducing artifacts. However, this method can significantly degrade image quality, leading to visible distortions, particularly in graphics with intricate details or fine gradients of color. Instead, we will focus on lossless compression techniques that maintain image quality while reducing file size.
When optimizing blur box PNGs, start by resizing the image to the desired dimensions and resolution. By reducing its physical size, you effectively reduce the number of pixels and, consequently, the file size. Additionally, resizing can help sharpen the image, improving its visual appearance.
To further compress the image, consider reducing the number of color channels. PNGs typically store color information in red, green, blue, and alpha (transparency) channels. However, in some cases, not all color channels are needed. By converting the image to grayscale or using a reduced color palette, you can significantly reduce the file size without noticeable quality loss.
Another effective method to optimize blur box PNGs is to remove unnecessary metadata from the image file. Metadata, such as creation date or camera information, can be useful but often adds unnecessary bulk to the file size. Tools like PNG optimizer can help remove this metadata, further reducing the file size and improving loading times.
Lastly, consider using advanced techniques like PNG quantization, which examines the image and identifies patterns that can be represented more efficiently. This technique is particularly effective for images with large areas of solid color or repeating patterns, as it reduces file size while maintaining image quality.
By implementing these methods, you can optimize and compress your blur box PNGs, resulting in smaller file sizes and faster loading times without compromising image quality or transparency. Achieving the right balance between file size and visual appeal is crucial for a positive user experience and improved web performance.
How to Optimize and Compress Blur Box PNGs for Faster Loading Times

The PNG file format is widely used on the web due to its support for alpha transparency, lossless compression, and high color depth. However, when it comes to images with a blur box effect, PNGs can be quite large in filesize, which can negatively impact the loading times of web pages.
To optimize and compress blur box PNGs for faster loading times, there are a few techniques you can use:
- Resize and reduce resolution: One way to optimize the PNG is to resize the image and reduce its resolution. By reducing its dimensions, you can significantly reduce the filesize while maintaining an acceptable level of visual quality. Be cautious not to resize it too much, as this may result in losing details and sharpness.
- Use an optimized palette: PNG images can use a fixed color palette instead of the full 24-bit color space. By limiting the number of colors used in the image, you can reduce its filesize while still preserving its visual quality. However, using an optimized palette may introduce color artifacts.
- Apply lossless compression: PNG format supports lossless compression, which means that you can reduce the filesize without losing any image quality. There are various tools available that can compress PNGs without sacrificing any data. Optimize the image by removing any unnecessary metadata and reducing the number of bits per channel to the minimum required.
- Consider lossy compression: In some cases, lossless compression may not be enough to achieve the desired reduction in filesize. In such situations, you can consider using lossy compression techniques specifically designed for PNG images. Keep in mind that lossy compression will result in a decrease in image quality and may introduce visual artifacts.
In conclusion, optimizing and compressing blur box PNGs can significantly improve the performance and loading times of web pages. By resizing, reducing resolution, using an optimized palette, and applying either lossless or lossy compression, you can achieve a smaller filesize without sacrificing too much image quality. Experiment with different optimization techniques to find the balance between reducing the filesize and maintaining visual integrity.
Understanding the Importance of Optimizing PNGs

In the web world, loading speed is crucial for delivering a smooth browsing experience. Users expect websites to load quickly, and slow loading times can lead to frustration and high bounce rates.
One way to improve website performance is by optimizing and compressing images. PNG (Portable Network Graphics) is a popular image format that supports lossless compression, transparency, and high resolution. However, it can also result in large file sizes, which negatively impact loading times.
When it comes to optimizing PNGs, there are two main approaches: lossy and lossless compression. Lossy compression reduces the file size by sacrificing some image quality, while lossless compression preserves all the image data without any quality loss.
For blur box PNGs, it is essential to consider the filesize and resolution. Resizing the image to the desired display size can dramatically reduce the file size. Additionally, eliminating unnecessary alpha channels or using a reduced color palette can further reduce the PNG’s size.
Transparency is also a characteristic that should be carefully considered. Although transparent images provide aesthetic appeal, they tend to have larger file sizes. It is crucial to strike a balance between transparency and file size optimization.
Optimizing PNGs not only results in faster loading times but also improved overall website performance. Compressed images reduce bandwidth usage and minimize the required server resources for delivering the content.
When compressing PNGs, it is also important to consider the presence of artifacts and the overall image quality. Over-compression can lead to visible artifacts, such as pixelation or blurriness. It is advisable to strike a balance between file size reduction and maintaining acceptable image quality.
Another aspect to consider during PNG optimization is metadata. Removing unnecessary metadata from the image file can further reduce the file size and improve loading times.
In conclusion, optimizing and compressing PNGs has a significant impact on web performance. By reducing file size and optimizing image format, blur box PNGs can be loaded faster, resulting in a smoother browsing experience for users.
Note: To optimize PNGs effectively, it is recommended to use specialized image compression tools or libraries that offer advanced features like lossless or lossy compression, metadata removal, color channel reduction, and sharpening algorithms.
Why Optimizing PNGs is Important
Optimizing and compressing PNGs is crucial for improving the performance and speed of websites. The PNG format is widely used due to its support for transparency and high-quality images, but it can also result in large file sizes that slow down loading times. By optimizing PNGs, you can reduce file sizes and improve loading speeds, resulting in a better user experience for your visitors.
When it comes to PNG optimization, there are two main approaches: lossy and lossless compression. Lossy compression reduces the file size by removing unnecessary data, which can result in a slight loss in image quality. Lossless compression, on the other hand, reduces the file size without sacrificing any image quality.
One of the main benefits of optimizing PNGs is the reduction in file size. Smaller file sizes mean faster loading times, especially for users with slow internet connections or limited bandwidth. Compressed PNGs also take up less storage space on your server, allowing for more efficient website management.
Optimizing PNGs can also help reduce the amount of bandwidth needed to load images. This is particularly important for mobile users who may have limited data plans. By compressing PNGs, you can decrease the amount of data that needs to be downloaded, resulting in faster page load times and lower data usage.
Furthermore, optimizing PNGs can help improve the overall performance of your website. When PNG images are not optimized, they can cause delays in page rendering and increase the time it takes for your website to fully load. By compressing and optimizing PNGs, you can minimize these delays and improve the speed and responsiveness of your site.
Another advantage of PNG optimization is the ability to reduce or eliminate artifacts that may occur during resizing or other image manipulations. Compressed PNGs with optimized settings can help preserve the original image quality and minimize any visual distortions or artifacts that may be introduced during the compression process.
In addition to reducing file sizes and improving loading times, optimizing PNGs also allows for better control of image quality and metadata. By optimizing PNGs, you can adjust the color depth, resolution, and other parameters to achieve the desired balance between image quality and file size. This level of control can help you optimize your images specifically for the web and ensure that they look their best while still providing fast loading times.
In conclusion, optimizing and compressing PNGs is essential for faster loading times, improved website performance, and a better user experience. By reducing file sizes, eliminating artifacts, and optimizing image quality, you can speed up your website and make it more efficient for users. So don’t overlook the importance of PNG optimization when it comes to web development!
The Impact of Large PNG File Sizes on Loading Times
When it comes to optimizing and compressing blur box PNGs for faster loading times, one of the key factors to consider is the file size. Large PNG file sizes can have a significant impact on the speed at which your web pages load, affecting user experience and overall performance.
Blur box PNGs are images that have been blurred or have a box-shaped effect applied to them. These effects can create visually appealing designs, but they can also result in larger file sizes compared to regular PNG images.
The larger the file size, the longer it takes for the image to load, especially on slower internet connections. This can lead to a frustrating user experience, with visitors having to wait for the image to fully load before they can view the content of the web page.
In order to reduce the file size of blur box PNGs and optimize them for faster loading times, there are several techniques you can use.
1. Resize and Crop the Image
Resizing and cropping the image to the appropriate size can significantly reduce its file size. By adjusting the dimensions of the image to match the required display size on your web page, you can eliminate unnecessary pixels and reduce the file size without compromising image quality.
2. Use Lossy Compression

Lossy compression is a technique that reduces file size by discarding some of the image’s data. This can result in a slight loss in image quality, but the trade-off is a significant reduction in file size. By adjusting the compression settings, you can find a balance between file size and image quality that meets your requirements.
3. Optimize Alpha Channel and Transparency
If your blur box PNGs contain transparency or an alpha channel, optimizing these elements can help reduce file size. The alpha channel determines the level of transparency in an image, and by optimizing it, you can eliminate unnecessary data and reduce the file size without affecting the visual appearance of the image.
4. Remove Metadata and Color Profiles
When saving blur box PNGs, make sure to remove any metadata or color profiles that are not necessary for the image to be displayed correctly. This metadata can add unnecessary bloat to the file size, and by removing it, you can reduce the file size without affecting the visual quality of the image.
5. Use Lossless Compression

If maintaining the highest image quality is crucial, you can use lossless compression techniques to reduce file size. Unlike lossy compression, lossless compression maintains the original image quality while still reducing file size. This can be achieved by optimizing the image’s color palette and reducing the number of colors used.
By implementing these techniques, you can significantly reduce the file size of your blur box PNGs, resulting in faster loading times and improved web performance. Remember to test your optimized images on different devices and internet connections to ensure optimal loading speeds for all users.
Techniques to Optimize and Compress Blur Box PNGs
When it comes to loading times on the web, every millisecond matters. Images play a crucial role in the overall performance of a website, and optimizing and compressing them is essential. In this article, we will discuss techniques to optimize and compress blur box PNGs for faster loading times.
Compressing blur box PNG images involves reducing their file size without sacrificing image quality. This can be achieved through various optimization techniques.
1. Resize and Crop Images: Resize the image to the dimensions required on the web page. By reducing the image dimensions, you can significantly reduce the file size.
2. Use a Lossless Compression Format: PNG format supports lossless compression, which reduces file size without losing any image quality. Opt for PNG format for blur box images to maintain transparency and crispness.
3. Optimize the Color Palette: Reducing the number of colors in your image can significantly reduce the file size. Convert the image to a color palette with fewer colors to improve compression.
4. Remove Metadata: Many images contain metadata that is not necessary for displaying the image. Removing this metadata can reduce the file size and improve loading speed.
5. Reduce Alpha Channel: If your blur box PNG image does not require transparency, consider removing the alpha channel. This can further reduce the file size.
6. Apply Lossy Compression: For blur box images, which are often used for background or decorative purposes, lossy compression techniques can be applied selectively to reduce file size. Experiment with different compression settings to find the right balance between quality and file size.
7. Sharpen the Image: Sometimes, blur box PNG images can appear fuzzy due to compression. Applying a slight sharpening effect can enhance image clarity and reduce compression artifacts.
By implementing these techniques, you can optimize and compress blur box PNGs, resulting in smaller file sizes and faster loading times for your website. Remember to test the performance of your optimized images on different devices and browsers to ensure the best possible speed and performance.
Choosing the Right File Format for Blur Box PNGs
When it comes to optimizing and compressing blur box PNGs for faster loading times, choosing the right file format is crucial. The format you select can greatly affect the quality, filesize, and overall performance of your images on the web.
Blur box PNGs are commonly used to create a blurred effect around a focal point in an image. This effect can be achieved by applying a blur filter or by resizing and positioning a smaller, lower-resolution version of the original image. To maintain transparency and sharpness, PNG format is typically preferred for blur box images.
However, PNG files can be quite large in size, especially when they include alpha channel transparency. To optimize and reduce file size, there are two main approaches: lossy compression and lossless compression.
Lossy compression involves reducing the quality of the image to achieve a smaller filesize. It works by discarding some of the image’s data and compressing the remaining information. While this approach can significantly reduce the file size, it may also result in a noticeable loss of image quality and sharpness, which is something to consider when using blur box PNGs.
Lossless compression, on the other hand, aims to reduce the file size without sacrificing image quality. It achieves this by finding and eliminating redundant data and compressing the remaining pixels. This method is typically used for preserving the highest level of quality and sharpness in blur box PNGs.
In addition to compression, considering the number of colors used in the image can also impact the filesize. By reducing the color palette and using indexed colors, you can further optimize your blur box PNGs for the web.
Lastly, metadata can also contribute to the overall file size. Removing unnecessary metadata, such as date and location information, can reduce the filesize without affecting the visual appearance of the blur box PNGs.
In conclusion, when optimizing and compressing blur box PNGs for faster loading times, consider using the PNG format to preserve transparency and sharpness. Choose between lossy and lossless compression techniques based on your desired trade-off between quality and filesize. Additionally, reducing the color palette and removing metadata can further optimize the performance of your blur box PNGs on the web.
Reducing Blur Box PNG File Sizes with Lossless Compression
One way to optimize and compress blur box PNGs for faster loading times is by using lossless compression techniques. These techniques help reduce the file size without sacrificing image quality or transparency.
Lossless compression works by identifying and eliminating unnecessary data from the PNG file. This means that the image resolution, color palette, and metadata remain intact, resulting in a smaller file size without any noticeable loss in image quality.
One way to achieve lossless compression is by using specialized tools and software that are designed to compress PNG files without compromising quality. These tools can analyze and optimize the file structure, remove any redundant data, and apply efficient compression algorithms to reduce the file size.
Additionally, resizing the image can also help reduce the file size. By decreasing the dimensions of the image, you can effectively reduce the amount of data needed to represent the image, resulting in a smaller file size and faster loading times.
When compressing blur box PNGs, it’s important to distinguish between lossless and lossy compression. Lossy compression techniques can result in a further reduction in file size, but at the cost of image quality. This may introduce compression artifacts or reduce the fidelity of the color and transparency channels in the image.
By using lossless compression techniques, you can maintain the image’s alpha channel and transparency while still achieving smaller file sizes. This is especially important for web performance, as smaller file sizes lead to faster loading times and a better user experience.
In conclusion, optimizing and compressing blur box PNGs can be achieved through lossless compression techniques. By reducing the file size without sacrificing image quality or transparency, you can significantly improve the loading speed and performance of your website.
Utilizing Image Compression Tools for Optimal Results

When it comes to optimizing and compressing blur box PNGs for faster loading times on the web, utilizing image compression tools can greatly improve performance. These tools are specifically designed to reduce file sizes without compromising image quality. With the right techniques and settings, you can effectively optimize and compress PNGs for faster loading speeds.
One of the main benefits of image compression is reducing file size, which directly impacts loading times. By removing unnecessary metadata and reducing color palette, you can significantly reduce the size of PNG files. This is especially important for web images, as smaller file sizes allow for faster loading speeds, resulting in a better user experience.
A popular method of image compression is using lossy algorithms, which remove unnecessary data and artifacts from the image. This can further reduce file sizes, but it is important to find the right balance between compression and image quality. Lossy compression is particularly effective for PNGs with transparency, blur, or other effects, as it can help reduce file sizes without noticeable degradation of the image.
Resizing and optimizing the resolution of images is another important step in image compression. By resizing images to fit the desired display size on the web, you can eliminate unnecessary pixels and further reduce file sizes. Additionally, optimizing images for web use can include sharpening, reducing noise, and adjusting color to ensure optimal visual quality and faster loading times.
When compressing PNGs, it is important to consider the color depth and channel settings. PNG files support various color modes, such as RGB and RGBA, with the latter providing support for transparency. By reducing the number of color channels or using indexed color palettes, you can effectively reduce file sizes without sacrificing image quality. It is also important to consider the use of alpha channel for transparency, as it can significantly affect the file size.
In addition to these compression techniques, it is important to choose the right file format for your web images. While PNGs are commonly used for their support of transparency and lossless compression, other formats like JPEG and WebP can offer better compression and faster loading speeds in certain scenarios. It is worth exploring the different formats and their specific advantages for your particular use case.
Overall, utilizing image compression tools and techniques can greatly optimize and compress blur box PNGs for faster loading times on the web. By reducing file sizes, removing unnecessary data, and optimizing image settings, you can improve performance and deliver a better user experience. Experiment with different compression settings and formats to find the optimal balance between file size and image quality for your specific needs.
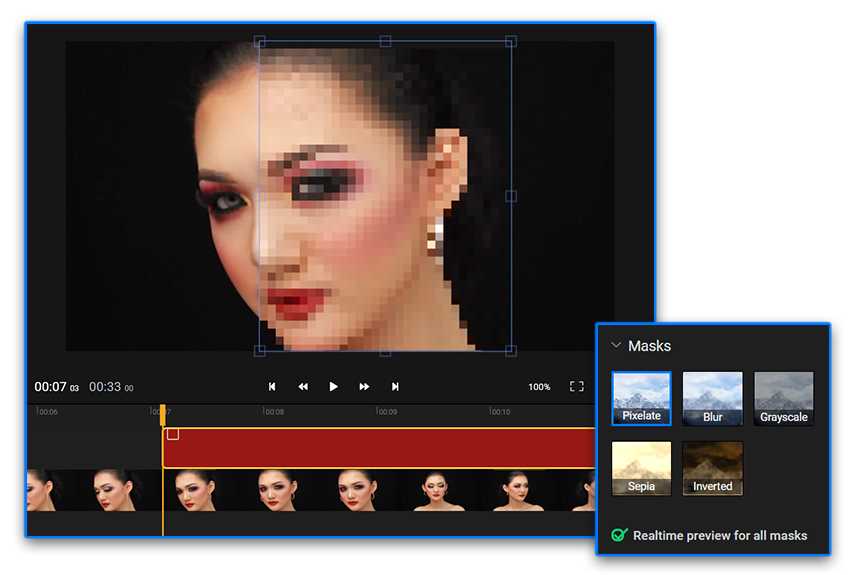
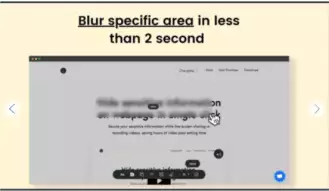
What are blur box PNGs?
Blur box PNGs are a type of image file format that allows for the inclusion of a blurred area within the image. This can be useful for showcasing images with sensitive or confidential information that needs to be obscured.
Why is it important to optimize and compress blur box PNGs?
Optimizing and compressing blur box PNGs is important for faster loading times. By reducing the file size of the image, it can be loaded more quickly by visitors to your website or application. This can improve user experience and minimize the risk of users leaving your site due to slow loading times.
What are some techniques for optimizing and compressing blur box PNGs?
There are several techniques for optimizing and compressing blur box PNGs. One approach is to use image editing software to reduce the dimensions of the image, thereby reducing the file size. Additionally, you can use image compression algorithms and tools to further reduce the file size without significantly impacting the image quality. It’s also important to choose an appropriate file format and compression method based on the specific needs of your application.

+ There are no comments
Add yours