


The Blurring Tool is a professional-quality software that allows you to enhance your product photography and make it visually appealing. With this powerful tool, you can edit, sharpen, adjust, and remove any imperfections from your product images.
One of the key features of the Blurring Tool is the ability to adjust the background and lighting of your images. You can easily enhance the contrast, retouch the details, resize, and even add or remove shadows to achieve the perfect look.
Whether you want to focus on a specific detail or create a professional-looking image, the Blurring Tool allows you to crop, adjust saturation and brightness, and enhance the overall image quality. This tool is perfect for product photographers who want to add a touch of professionalism to their work.
By using the Blurring Tool, you can remove distractions from the background, highlight the important elements of your product, and create stunning images that will captivate your audience. Don’t let poor photography hold you back – take advantage of this powerful tool and elevate the quality of your product images.
Benefits of Using the Blurring Tool
The blurring tool is an essential feature in any photo editing software, especially when it comes to product photography. This tool allows you to enhance your images by adding a soft and subtle blur effect, which can greatly improve the overall visual appeal of your product photos.
One of the key benefits of using the blurring tool is the ability to create a sense of depth and dimension in your product images. By applying a slight blur to the background, you can make your subject stand out and draw the viewer’s attention to the most important details of your product. This can help in highlighting the unique features, intricate details, and overall quality of your product.
Another advantage of using the blurring tool is the ability to adjust the lighting and brightness of your images. By selectively blurring certain areas of the image, you can create a more even and balanced lighting setup, resulting in a more professional-looking photograph. This can help in improving the overall composition and satisfaction of your product photography.
In addition, the blurring tool can also be used to remove any distracting elements or imperfections from your product photos. Whether it is a minor flaw, a messy background, or a shadow that takes away from the main subject, the blurring tool can help in minimizing these distractions and ensuring that your product takes center stage. This can help in creating a more polished and clean image, enhancing the professional feel of your product photography.
Furthermore, the blurring tool provides the option to adjust the saturation, contrast, and sharpness of your product images. This allows you to fine-tune and enhance the colors and details of your product, resulting in a more vibrant and eye-catching photograph. Whether you want to make your product pop with vibrant colors or create a more subdued and elegant look, the blurring tool gives you the flexibility to achieve the desired effect.
Finally, the blurring tool can also be used for basic editing tasks such as cropping, resizing, and retouching your product photos. This can help in optimizing the composition and layout of your images, ensuring that they are well-suited for different platforms and mediums. Whether you are preparing your product photos for an e-commerce website or a print catalog, the blurring tool can help in achieving a professional and consistent look across all platforms.
| Benefits of Using the Blurring Tool: |
| – Enhances the overall visual appeal of product photos |
| – Adds depth and dimension to images |
| – Highlights the unique details and quality of products |
| – Adjusts the lighting and brightness for a more professional look |
| – Removes distractions and imperfections |
| – Enhances colors and details for a more vibrant photograph |
| – Enables basic editing tasks such as cropping and resizing |
| – Helps in achieving a professional and consistent look |
In conclusion, the blurring tool is a valuable asset in product photography that allows you to enhance and optimize your images for maximum impact. Whether you are looking to add depth and dimension, adjust lighting and brightness, remove distractions, or fine-tune colors and details, the blurring tool provides the necessary functions to achieve professional and visually appealing product photography. Invest in a high-quality photo editing software with a reliable and versatile blurring tool to take your product photography to the next level!
Improved Visual Focus

With our professional editing software and the Blurring Tool, you can easily enhance the visual focus of your product photography. Whether you need to edit, resize, or add special effects to your images, our tool is designed to help you achieve high-quality results.
By sharpening the focus and adjusting the contrast, brightness, and saturation levels, you can enhance the visual appeal of your products. Our Blurring Tool allows you to remove unwanted background distractions, retouch any imperfections, and adjust the lighting and shadow details to give your images a polished and professional look.
- Effortlessly edit and enhance your product photos
- Easily resize and adjust the image to fit your needs
- Apply special effects to create unique visuals
- Sharpen the focus and improve the overall quality
- Add depth and professionalism to your images
Using our Blurring Tool, you have the power to transform your product photography and captivate your audience. With just a few adjustments, you can create stunning visuals that highlight the details and features of your products. Enhance your website, online store, or marketing materials with high-quality images that grab attention and leave a lasting impression.
Increased Professionalism
The Blurring Tool is an essential feature of our software that can greatly improve the quality and professionalism of your product photography. With this tool, you can enhance your images by adjusting various aspects such as saturation, contrast, brightness, and color. By using the Blurring Tool, you have the ability to remove any distracting elements in the background, thus allowing your product to become the focal point of the image.
Professional photographers understand the importance of perfecting every detail in their images. With the Blurring Tool, you can sharpen and enhance the details of your product, making it look even more enticing to potential customers. You can also adjust the lighting and shadow to create a more appealing and professional look.
In addition to its retouching capabilities, the Blurring Tool also allows you to resize and crop your images, ensuring that they are the perfect dimensions for your website or promotional materials. By using this tool, you can easily adjust the focus and composition of your product photography, resulting in highly professional and visually appealing images.
With the Blurring Tool, you have the ability to edit and enhance your product photography with ease. Whether you’re a professional photographer or a small business owner, this tool is essential for achieving a professional and polished look for your product images.
|
|
|
| Before Editing | After Editing |


Highlighting Product Details
When it comes to product photography, attention to detail is crucial. Highlighting the key features and unique aspects of your products can greatly enhance their visual appeal and help attract customers. This is where the Blurring Tool comes into play.
The Blurring Tool is a powerful editing feature in professional software that allows you to adjust the color, contrast, and brightness of specific areas in your images. By strategically applying blurring effects, you can draw attention to the important details of your product while creating a visually appealing and clean look.
One of the main benefits of using the Blurring Tool is the ability to remove distractions and background elements that might take away from the focus on your product. With precise editing, you can sharpen the details and enhance the overall quality of the image, making your product stand out.
Additionally, the Blurring Tool can help you highlight the texture, shadow, and lighting of your product, adding depth and professionalism to your photographs. By adjusting the saturation and contrast levels, you can make the colors pop and create a visually captivating image.
Furthermore, the Blurring Tool allows you to resize and crop your product images, ensuring they are properly framed and ready for various marketing materials such as websites, catalogs, and social media posts. This level of control gives your product photography a polished and consistent look, reinforcing your brand’s professionalism.
In conclusion, the Blurring Tool is an indispensable tool for enhancing product photography. Its ability to highlight product details, remove distractions, adjust lighting, and improve image quality makes it an essential part of any photographer’s toolkit. Whether you are retouching images for an online store or creating visuals for a marketing campaign, the Blurring Tool will help you take your product photography to the next level.
How to Use the Blurring Tool
When it comes to product photography, having a sharp and focused image is crucial. However, there are times when you may want to create a more artistic or visually appealing effect by blurring certain areas of your photo. Using the blurring tool can help you achieve this desired effect while still maintaining the overall quality and professionalism of your image.
The blurring tool allows you to selectively blur specific parts of your product photography, such as the background, to enhance the focus on the product itself. By adjusting the brightness, contrast, saturation, and other parameters, you can further enhance the details and make your product stand out.
Here is a step-by-step guide on how to use the blurring tool effectively:
- Open the photo: Begin by opening your product photograph in your preferred editing software. Make sure you have a high-quality image to work with, as this will ensure the best results.
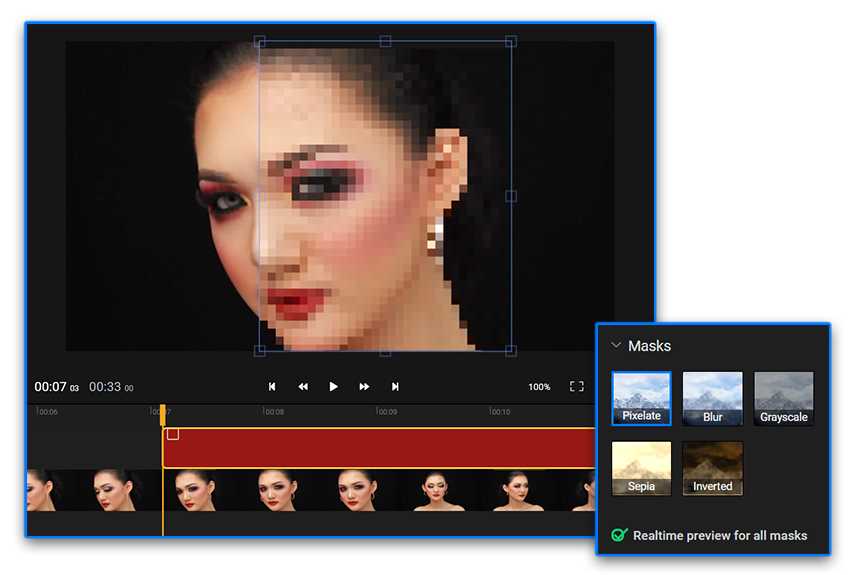
- Choose the blurring tool: Locate and select the blurring tool in your editing software. It is usually represented by an icon resembling a drop of water or a circle with a line through it.
- Select the area to blur: Decide which area of your photo you want to blur. This could be the background, a specific object, or any other area that you feel will enhance the overall look and feel of the image.
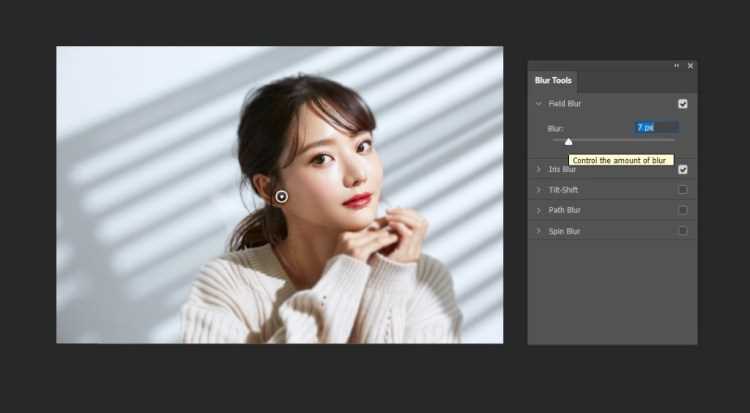
- Adjust the blurring intensity: With the blurring tool selected, adjust the intensity or strength of the blur effect. You can usually do this by dragging a slider or using a numerical value. Experiment with different levels of blurring to find the perfect balance for your image.
- Apply the blurring effect: Once you are satisfied with the blurring intensity, apply the effect to the selected area. The blurring tool will then process the image, creating a soft and gradual transition between the focused and blurred parts.
- Retouch and adjust: Take a closer look at your image and make any necessary retouches or adjustments. You may want to fine-tune the lighting, contrast, color, or sharpen certain areas to further enhance the overall visual appeal of the image.
- Resize and crop: Depending on your specific requirements, you might need to resize or crop the image to fit different platforms or mediums. Be sure to maintain the aspect ratio and composition while doing so.
- Save and export: Finally, save the edited image in a suitable format without losing too much quality. You can choose JPEG for web-based use or PNG for maintaining transparency. Export the image in the highest resolution possible for optimal viewing experience.
By following these steps and effectively using the blurring tool, you can add a touch of creativity and professionalism to your product photography. Experiment with different blurring effects and ensure that your product stands out with enhanced detail, focus, and visual appeal.
Selecting the Right Image
When it comes to product photography, selecting the right image is crucial for creating a visually appealing and professional result. The quality of the image you choose will greatly impact the overall appeal and effectiveness of your product photography.
Firstly, consider the brightness and lighting in the image. A well-lit and properly exposed photograph will enhance the overall quality and appeal of the product. Look for images that have good lighting, as this will help to highlight the details and colors of the product.
Next, pay attention to the background and the colors in the image. A clean and uncluttered background will help to focus the viewer’s attention on the product itself. The colors in the image should be accurate and true to life, as this will help to convey the professionalism and quality of your product.
Additionally, look for images with a good amount of detail. This can be especially important when selling products online, as customers rely on the visual representation to make purchasing decisions. Images with high levels of detail will give customers a better understanding of the product and can help to build trust in its quality.
Consider the composition of the image as well. Look for images that are well-framed and properly cropped. This will help to create a visually pleasing and balanced photograph. Pay attention to the contrast and shadow in the image, as these elements can add depth and dimension to the product.
Once you have selected the right image, you can further enhance it using editing software and the blurring tool. The blurring tool allows you to remove distractions from the background and adjust the focus on the product. You can also retouch any imperfections, adjust the saturation, resize the image, and apply other effects to ensure the final photograph is of the highest quality.
By selecting the right image and using the blurring tool to enhance it, you can create professional and visually appealing product photography that will showcase your products in the best possible light.
How does the blurring tool enhance product photography?
The blurring tool can enhance product photography by selectively blurring certain parts of the image, which can help draw attention to the main subject or create a sense of depth. This can make the product stand out and appear more professional.

+ There are no comments
Add yours