


When it comes to taking stunning photos with your iPhone, there are several key factors to consider. From cropping and angles to zoom and enhancing, these tips will help you capture the perfect shot every time. One of the first things to pay attention to is the lighting. The right lighting can make all the difference in your photos, so experiment with different angles and shadows to find the best composition. Additionally, reflections can add a unique touch to your images, so be on the lookout for interesting surfaces that can create captivating reflections.
Once you have captured your photo, there are several editing techniques you can use to enhance its clarity and sharpness. Adjusting the color and contrast can make your image pop, while editing the details can bring out the finer aspects of your subject. Applying filters is another great way to add a creative touch to your photos. Experimenting with different filters can dramatically change the mood and overall feel of your image.
When editing your photos, pay attention to the vignette effect, which can help draw attention to the main subject of your photo. Additionally, adjusting the resolution can improve the overall quality of your image and make it appear more professional. Don’t forget to enhance the highlights and reflections to bring out the details and add depth to your photos.
The iPhone camera offers various features that can help you achieve the perfect shot. Experiment with different focus settings and depth control to create a sense of depth and capture stunning portraits with a blurred background. Understanding exposure can also greatly enhance your photos. By adjusting the exposure settings, you can ensure that your subject is properly lit and avoid over or underexposure.
To further enhance your photos, consider adjusting the saturation levels. Increasing the saturation can make colors appear more vibrant and eye-catching, while decreasing it can create a more muted and subtle effect. These tricks and techniques will give your iPhone photos that extra boost in clarity and make them stand out from the crowd.
Mastering Clarity in iPhone Photography

When it comes to capturing memorable moments, the camera on your iPhone is a powerful tool. With its advanced features and capabilities, you can take stunning photos that rival those taken with dedicated cameras. However, achieving clarity in your iPhone photography can sometimes be challenging. That’s where these top tips and tricks come in.
One of the first things to consider when enhancing clarity in your iPhone photos is the depth of field. By adjusting the focus and using the Portrait mode, you can create a beautiful bokeh effect that separates your subject from the background. This depth creates a sense of dimension and makes the details in your photos stand out.
Applying filters is another way to enhance clarity in your iPhone photos. Experiment with different filters to enhance the highlights and shadows, and to add depth and contrast to your images. Filters can help to bring out the details in your photos and make them look more vibrant.
Editing your photos is an essential step in enhancing clarity. Use editing tools such as adjusting the exposure, sharpness, and saturation to optimize the lighting and colors in your images. You can also crop your photos to improve the composition and remove any distractions that may take away from the clarity of the subject.
Another tip for improving clarity in your iPhone photos is to pay attention to lighting. Good lighting can make a significant difference in the sharpness and details of your photos. Avoid shooting in harsh or dim lighting conditions and look for natural light sources that provide a soft and even illumination.
Experiment with different angles to find the best way to capture clarity in your photos. Play with perspective and try shooting from low or high angles to add interest and depth. Zooming in on your subject can also help to highlight the details and make them appear sharper.
Pay attention to the reflections in your photos as well. Sometimes, reflections can add a unique element to your images and enhance their clarity. Look for reflective surfaces such as water or glass that can create interesting reflections and bring a new dimension to your photos.
Composition is another key factor in achieving clarity in your iPhone photography. Pay attention to the placement of your subject and the elements in the frame. Use the rule of thirds to create a balanced and visually appealing composition that directs the viewer’s attention to the main subject.
Finally, don’t forget about the details. Paying attention to the small details in your photos can significantly enhance their clarity. Look for intricate patterns, textures, and fine lines that can make your photos more visually appealing and captivating.
By applying these tips and tricks, you can master clarity in your iPhone photography. Whether you’re capturing landscapes, portraits, or everyday moments, these techniques will help you create stunning and clear photos that truly stand out.
Understanding Basic Settings

When it comes to enhancing the clarity of your iPhone photos, understanding the basic settings is crucial. These settings allow you to control various aspects such as filters, depth, sharpness, contrast, highlights, and more. Here are some top tips and tricks for getting the most out of your iPhone’s camera:
- Lighting: Pay attention to the lighting conditions when taking photos. Natural lighting can help bring out the details and colors in your photos, while harsh lighting can create strong shadows and reflections.
- Composition: Consider the composition of your photo before taking the shot. Experiment with different angles and framing techniques to create visually appealing images.
- Focus and Exposure: Use the iPhone’s autofocus and exposure features to ensure that your subject is sharp and properly exposed. Simply tap on the screen to set the focus and adjust the exposure.
- Zoom and Resolution: Avoid using digital zoom, as it can reduce the quality and clarity of your photos. Instead, get closer to your subject or use optical zoom if available. Also, always make sure to shoot at the highest resolution possible for better image quality.
- Editing: After taking your photos, take advantage of editing tools to further enhance the clarity and details. Adjust the brightness, contrast, saturation, and clarity to achieve the desired results.
- Cropping and Vignette: Sometimes, cropping your photo to remove distracting elements or to improve composition can greatly enhance clarity. Additionally, adding a subtle vignette effect can help draw the viewer’s attention to the subject.
By understanding and utilizing these basic settings, you can greatly improve the clarity and overall quality of your iPhone photos. Experiment, practice, and have fun capturing stunning moments with your iPhone’s camera!
Adjusting Exposure and Focus

When it comes to capturing clear and vibrant photos on your iPhone, adjusting exposure and focus is key. These tips and tricks will help you enhance the clarity and sharpness of your images.
1. Tap to focus: Take control of your iPhone camera’s focus by tapping on the area you want to highlight. This will not only adjust the focus but also the exposure, giving you a well-balanced shot.
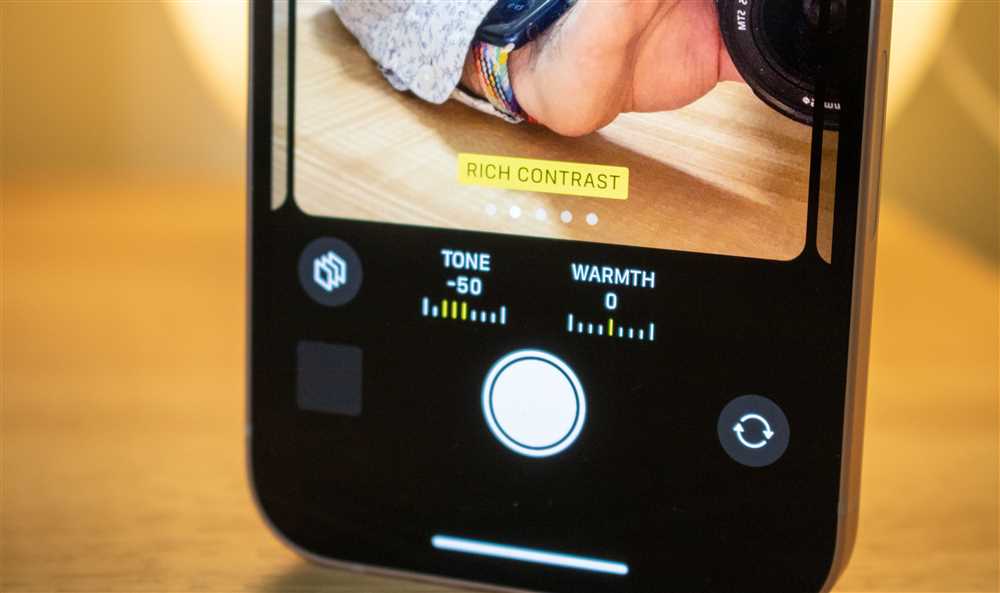
2. Adjust exposure manually: If you’re not satisfied with the iPhone’s automatic exposure settings, you can manually adjust it by using the sun icon that appears on the screen when you tap to focus. Slide your finger up or down to increase or decrease the exposure.
3. Use HDR mode: High Dynamic Range (HDR) mode is great for capturing photos with a wider range of colors and details, especially in challenging lighting conditions. When enabled, your iPhone will take multiple photos with different exposures and combine them into one well-exposed image.
4. Avoid reflections: Reflections can often ruin a photo, so be mindful of them when composing your shot. Change your angles or use your hand to block any unwanted reflections from windows or other shiny surfaces.
5. Experiment with filters: The iPhone’s camera app has built-in filters that can enhance the colors, contrast, and saturation of your photos. Play around with different filters to find the one that suits your style and enhances the details in your images.
6. Zoom in for detail: The iPhone camera’s zoom feature can help you capture fine details in your photos. However, keep in mind that digital zoom can reduce the resolution of your images, so use it sparingly and try to get closer to your subject whenever possible.
7. Enhance the composition: Pay attention to the composition of your photos. Consider the rule of thirds, leading lines, and framing techniques to create visually appealing images. A well-composed photo will naturally have more clarity and impact.
8. Dealing with shadows and highlights: The iPhone camera tends to struggle with high contrast scenes, where there are areas of bright highlights and deep shadows. To ensure a well-exposed photo, tap to focus on the area you want to prioritize, or use the HDR mode mentioned earlier.
9. Experiment with color editing: After taking a photo, consider using editing tools to adjust the color balance, saturation, and contrast. This can significantly improve the clarity and vibrancy of your images.
10. Try cropping and adding a vignette: If your photo has distracting elements or lacks focus on the subject, cropping can help you reframe the image and bring attention to the important details. Adding a subtle vignette can also enhance the overall depth and focus of your photo.
With these tips and tricks, you can take your iPhone photography to the next level, enhancing the clarity and overall quality of your photos. Experiment with different techniques and have fun capturing beautiful moments!
Utilizing HDR Mode
One of the top features on your iPhone camera for enhancing clarity in your photos is the HDR (High Dynamic Range) mode. HDR mode is designed to capture a wider range of exposure and bring out more details in both the highlights and shadows of an image.
This mode works by taking multiple photos at different exposures and then combining them to create a single image with enhanced dynamic range and clarity. It’s especially useful in situations where there is a high contrast between the highlights and shadows, such as a landscape with a bright sky and dark foreground.
To utilize HDR mode, simply open your camera app and tap on the HDR icon located at the top of the screen. Your iPhone will then automatically take multiple shots at different exposures and process them into one image with enhanced clarity and contrast.
When using HDR mode, it’s important to keep the following tips and tricks in mind:
| 1. Avoid Camera Shake: | Hold your iPhone steady or use a tripod to prevent any blur or vignetting in your HDR photos. |
| 2. Adjust Exposure: | You can manually adjust the exposure of your HDR photos by tapping on different areas of the screen to set the focus and exposure point. |
| 3. Use Different Angles: | Experiment with different angles to capture the best composition and make your HDR photos more visually interesting. |
| 4. Enhance Lighting: | Utilize HDR mode to capture the details and reflections in both bright highlights and dark shadows, making your photos more balanced and lifelike. |
| 5. Avoid Overprocessing: | While HDR can enhance clarity, make sure not to overprocess your photos, as it can result in unnatural colors and excessive sharpness. |
| 6. Zoom In: | Zooming in on your subject can help you capture more details and improve the overall resolution of your HDR photos. |
| 7. Use Editing Tools: | After capturing your HDR photos, you can further enhance their clarity and contrast using editing tools like cropping, filters, saturation, and contrast adjustments. |
By utilizing the HDR mode on your iPhone camera, you can capture stunning photos with enhanced clarity, contrast, and depth. Experiment with different lighting conditions and subjects to fully explore the capabilities of this powerful feature.
Using Gridlines for Composition

When it comes to capturing stunning photos with your iPhone, composition is key. One useful tool that can help you improve your composition is the gridlines feature. Gridlines are a set of horizontal and vertical lines that divide the frame of your camera into thirds, creating a grid pattern.
By enabling the gridlines on your iPhone camera, you can easily apply the rule of thirds, which is a popular composition technique. The rule of thirds suggests that you should align the main subjects or points of interest in your photo along the gridlines or at the intersections of the lines.
The gridlines help you achieve a balanced and visually appealing composition. They can guide you in placing your subjects in a more interesting way and help you create a sense of depth and movement in your photos.
Using the gridlines can also assist you in adjusting the exposure, highlights, shadows, contrast, saturation, and other settings while taking the photo or during the editing process. This way, you can ensure that your iPhone photos have optimal lighting and color.
In addition to composition, the gridlines can aid you in capturing reflections, details, and enhancing any existing reflections in your photos. By aligning the gridlines with the reflective surface, you can achieve a more balanced and visually pleasing reflection.
Moreover, the gridlines can be helpful for achieving accurate horizons, straight lines, and avoiding tilted or slanted angles in your photos. This can significantly improve the overall quality and professionalism of your iPhone photos.
By using the gridlines on your iPhone camera, you can also make use of the zoom, crop, and resolution features to further enhance the composition and details in your photos. These additional tricks can help you highlight specific subjects or create unique perspectives.
| Top Tips and Tricks for Using Gridlines: |
| – Align key elements along the gridlines or at the intersections for a more balanced composition. |
| – Adjust exposure, highlights, shadows, saturation, contrast, and other settings using the gridlines as a guide. |
| – Use the gridlines to capture and enhance reflections in your photos. |
| – Ensure straight lines and avoid tilted angles by aligning with the gridlines. |
| – Make use of zoom, crop, and resolution features for added composition and detail enhancements. |
Overall, utilizing the gridlines feature on your iPhone camera can greatly assist you in enhancing the clarity, details, and composition of your photos. Experiment with different angles, lighting conditions, and subjects to create visually stunning and professional-looking images.
Applying Advanced Techniques
When it comes to enhancing clarity in your iPhone photos, there are several advanced techniques that can take your photos to the next level:
- Focus: One of the top tips for enhancing clarity is to ensure that your subject is in sharp focus. Use the focus feature on your iPhone camera to achieve this.
- Composition: Pay attention to the composition of your photos. Framing your subject in an interesting way can greatly enhance the clarity and overall impact of your image.
- Exposure: Properly exposing your photos can make a huge difference in their clarity. Use the exposure adjustment feature on your iPhone camera to achieve the desired lighting conditions.
- Details: Pay attention to the details in your photos. Enhancing the sharpness of small details can greatly enhance the overall clarity and impact of your image.
- Cropping: Crop your photos strategically to remove any distracting elements and focus on the main subject. This can greatly enhance the clarity and composition of your image.
- Filters: Experiment with different filters to enhance the lighting, shadows, color, and resolution of your photos. Filters can greatly enhance the clarity and overall impact of your images.
- Highlights and Shadows: Adjusting the highlights and shadows in your photos can help enhance the clarity and depth of your images.
- Zoom: Use the zoom feature on your iPhone camera to get closer to your subject and capture more details. This can greatly enhance the clarity and overall impact of your image.
- Vignette: Adding a vignette effect to your photos can help draw attention to the main subject and enhance the clarity and composition of your image.
- Reflections: Incorporating reflections in your photos can add a unique and interesting element to your composition, enhancing the clarity and creativity of your image.
By applying these advanced techniques, you can greatly enhance the clarity and overall impact of your iPhone photos. Experiment with different angles, lighting conditions, and settings to find what works best for each photo you take. Don’t be afraid to get creative and push the boundaries of what your iPhone camera can do!
How can I improve the clarity of my iPhone photos?
To improve the clarity of your iPhone photos, you can try using the focus lock feature, cleaning the camera lens, adjusting the exposure, using HDR mode, and using a tripod for stability.
What is the focus lock feature and how can it help improve clarity?
The focus lock feature allows you to manually control the focus point in your photo. By tapping and holding on the screen where you want the focus to be, you can ensure that the main subject is in focus, resulting in a clearer image.
Why is cleaning the camera lens important for improving clarity?
Cleaning the camera lens is important because dust and smudges can affect the quality of your photos. By using a microfiber cloth or lens cleaning solution, you can remove any dirt or oils that may be on the lens, resulting in clearer and sharper photos.
What is HDR mode and when should I use it to enhance clarity?
HDR (High Dynamic Range) mode combines multiple exposures of the same scene to capture a wider range of details and tones. It can be useful in high-contrast situations, such as landscapes with bright skies and dark shadows, to enhance clarity and bring out more details in both the highlights and shadows of the image.
Do I need a tripod to improve clarity in my iPhone photos?
While using a tripod isn’t necessary for every situation, it can be beneficial in low-light conditions or when using a slow shutter speed. By keeping the camera steady on a tripod, you can eliminate any motion blur caused by hand shake, resulting in sharper and clearer photos.


+ There are no comments
Add yours