


Welcome to the beginner’s guide to using the blurring tool in Adobe Illustrator! If you’re new to Illustrator or just starting to explore the editing capabilities of this powerful software, this tutorial will help you understand how to effectively use the blurring tool to enhance your artwork.
The blurring tool in Adobe Illustrator allows you to add a soft and subtle effect to your vector artwork. Whether you want to create a gradient effect, adjust the opacity of certain areas, or blend different elements together, the blurring tool is a versatile tool that can help you achieve the desired results.
When using the blurring tool, it’s important to understand the different settings and options available. You can adjust the blur effect by changing the feather and opacity settings. The feather setting determines the softness of the blur, while the opacity setting controls how transparent the blur is. Experimenting with these settings will help you achieve the desired look for your artwork.
There are multiple ways to use the blurring tool in Adobe Illustrator. You can apply the blur effect to individual shapes, strokes, or even entire layers. By selecting the desired object or layer, you can easily access the blurring tool from the toolbars and apply the effect with the brush or mask. With these options, you have full control over how the blur effect is applied to your artwork.
As a beginner, it’s always helpful to have some tips and tricks to make your design process smoother. Here are a few tips to keep in mind when using the blurring tool in Adobe Illustrator:
- Start with a low amount of blur and gradually increase it until you achieve the desired effect.
- Use the brush tool to selectively apply the blur effect to specific areas of your artwork.
- Combine the blurring tool with other effects, such as gradients or shadows, to create more complex and visually appealing designs.
With these guidelines in mind, you’re now ready to start using the blurring tool in Adobe Illustrator. Don’t be afraid to experiment and explore different settings and options to unleash your creativity and add depth to your vector artwork!
Section 1: Understanding the Blurring Tool
The blurring tool in Adobe Illustrator is a powerful feature that allows beginners to edit and enhance their artwork. With this tool, you can soften the edges of an image or shape, create a blur effect, and add depth to your designs.
Using the blurring tool is easy, even for beginners. It can be found in the toolbar at the left side of the Illustrator window. Simply click on the blurring tool to select it and then click and drag on your artwork to apply the blur effect.
There are different settings and options that you can adjust to achieve the desired blurring effect. You can change the opacity of the blur, the size of the tool, and the type of blur (such as Gaussian or motion blur). These options can be found in the settings panel at the top of the Illustrator window.
One useful trick when using the blurring tool is to apply the blur effect to specific areas of your artwork, rather than the entire image. To do this, you can use the mask feature in Illustrator. By creating a mask layer, you can selectively apply the blur effect to only certain parts of your artwork.
Another helpful technique is to use the blurring tool in combination with other Illustrator tools, such as the gradient or feather tool. You can create interesting effects by combining different tools and adjusting their settings.
It’s important to note that the blurring tool works best on vector-based artwork. If you’re working with raster images, such as photographs, it’s recommended to edit them in a raster editing software before importing them into Illustrator.
In conclusion, the blurring tool in Adobe Illustrator is a valuable asset for beginners and experienced users alike. By understanding its functions and settings, you can easily enhance your artwork and create stunning designs. This tutorial will guide you through the various tips and tricks for using the blurring tool effectively.
What is the Blurring Tool in Adobe Illustrator?
The blurring tool is one of the many useful features found in Adobe Illustrator, a powerful vector editing software. This tool allows you to manipulate and soften the edges of objects or artwork in your design. Blurring an image or shape can add depth, create a focal point, or give your artwork a more realistic or abstract effect.
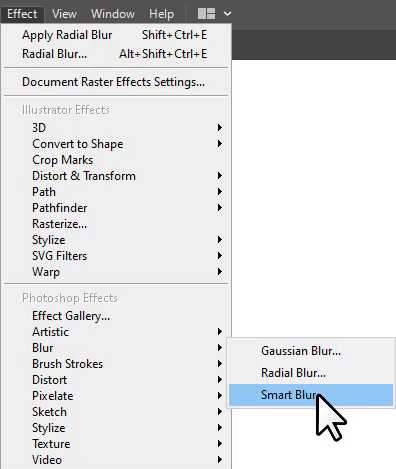
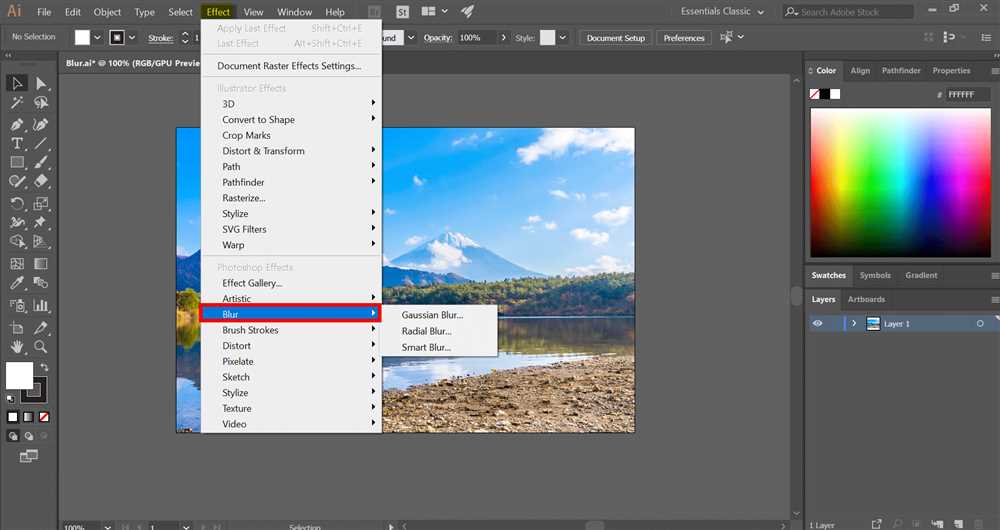
Using the blurring tool in Illustrator is fairly straightforward, even for beginners. You can access the blurring tool by selecting the object or shape you want to blur and clicking on the “Effect” menu at the top of the Illustrator window. From there, navigate to “Blur” and choose the type of blur effect you want to apply.
There are various options and settings you can adjust when using the blurring tool. You can adjust the radius to control the intensity of the blur effect, or use the feather and opacity settings to fine-tune the edges of your object. Additionally, you can apply the blur effect to specific areas or layers by using a mask or selecting individual strokes or fills.
There are also some helpful tips and tricks you can use when working with the blurring tool. For example, you can use the brush tool to selectively blur certain parts of your artwork and create interesting gradients or blends. You can also experiment with different blur settings and combinations to achieve the desired effect.
Overall, the blurring tool in Adobe Illustrator is a valuable tool for adding depth and creating a more polished look to your designs. Whether you’re a beginner or a seasoned Illustrator user, understanding how to use the blurring tool can greatly enhance your creative possibilities.
Why is the Blurring Tool useful for designers?
The Blurring Tool is an essential feature in Adobe Illustrator that allows designers to enhance their artwork by creating depth, dimension, and visual interest. It provides the ability to soften edges, add a soft focus effect, or create a sense of motion in an image.
Here are some key reasons why the Blurring Tool is useful for designers:
- Emphasize Focus – By applying the blurring effect, designers can draw attention to a specific area of an image or artwork by making it the focal point. Adjusting the blur settings and the brush size can help achieve the desired level of focus.
- Create Depth and Dimension – Adding a blurred background or foreground can create a sense of depth and dimension in a design. This technique can make the subject of the artwork stand out and give it a three-dimensional feel.
- Add Motion and Energy – The blurring effect can be used to create a sense of movement or energy in static images. By selectively blurring certain elements, designers can give the illusion of motion and bring visual interest to their artwork.
- Softening Edges – This tool is particularly useful for vector shapes and strokes. It allows designers to soften harsh edges and create smoother transitions between objects. By adjusting the feather and opacity settings, they can achieve a realistic and natural appearance.
- Blend and Mask Effects – The Blurring Tool can be used in combination with other tools, such as gradient fills or masks, to create more complex and visually appealing effects. This allows designers to blend colors seamlessly or mask certain areas of an image to achieve the desired result.
Whether you’re a beginner or an experienced designer, the Blurring Tool in Adobe Illustrator offers endless possibilities for enhancing your artwork. By experimenting with different brush settings, blurring techniques, and layering effects, you can create stunning visual effects that will truly make your designs stand out.
For more tips, tricks, and tutorials on using the Blurring Tool and other features in Adobe Illustrator, be sure to check out our comprehensive guide for beginners.
How does the Blurring Tool work?
The Blurring Tool in Adobe Illustrator is a powerful tool that allows you to create a blur effect on specific areas of your artwork. This tool is particularly useful when you want to create depth, blend different elements together, or soften the edges of shapes and lines.
To start using the Blurring Tool, select the object or the area you want to blur in your Illustrator document. You can use the selection tools, such as the Direct Selection Tool or the Lasso Tool, to select the desired vector shape, stroke, or gradient. Once selected, go to the toolbars and choose the Blurring Tool.
One of the tricks to effectively use the Blurring Tool is to adjust its settings properly. You can control the blur effect by adjusting the tool’s options, such as the brush size, opacity, and feather settings. The brush size determines the size of the brush used to apply the blur effect. The opacity setting controls the strength of the blur effect, from subtle to intense. The feather setting determines how smoothly the blur transitions from the blurred area to the non-blurred area.
Another useful feature of the Blurring Tool is the ability to create a blur mask. You can apply a blur effect to an entire layer and then use a mask to selectively reveal or hide the blurred areas. This allows you to have more control over which parts of your artwork are blurred.
To create a blur mask, first, select the layer you want to apply the blurring effect to. Then, go to the Layers panel and click on the “Add a vector mask” icon. This will add a mask to the selected layer. Next, use the Blurring Tool to apply the blur effect to the entire layer. Finally, use the Brush Tool to paint on the mask with black to hide the blur effect, or with white to reveal it. You can also use shades of gray to create a more subtle transition.
By using the Blurring Tool in Adobe Illustrator, you can enhance the visual appeal of your artwork, create a sense of depth and realism, and add a professional touch to your designs. Experiment with different settings, brush sizes, and techniques to achieve the desired blurring effect. With practice, you’ll become more comfortable using this powerful tool.
Section 2: Using the Blurring Tool in Adobe Illustrator
Once you have a basic understanding of the Blurring Tool in Adobe Illustrator, you can start using it to enhance your artwork. In this section, we will guide you through the various settings and techniques you can use to achieve different blurring effects.
1. Applying the Blurring Effect:
To apply the blurring effect to an object or shape, select the item you wish to blur by clicking on it with the Selection Tool. Then, go to the “Effect” menu, navigate to “Blur,” and choose the type of blur you want to apply. You can choose from options like Gaussian Blur, Motion Blur, or Radial Blur depending on the effect you want to achieve. Adjust the settings such as radius or angle to control the intensity and direction of the blur.
2. Blurring Backgrounds:
If you want to blur the background of your artwork, you can use the Blurring Tool to create a gradient blur effect. First, select the background layer or shape. Then, go to the Appearance panel and click on the “Add New Effect” button. Choose “Blur” and select the type of blur you want to apply. Adjust the settings to control the opacity and feather of the blur. This will give your artwork a soft and subtle background.
3. Blurring Strokes and Fills:
The Blurring Tool can also be used to blur strokes and fills of objects. Select the object you want to blur and navigate to the “Effect” menu. Choose “Blur” and select the type of blur you want to apply. Adjust the settings to control the intensity and spread of the blur. This can be useful for creating abstract or dreamy effects in your artwork.
4. Using the Blurring Tool with Masks:
You can combine the Blurring Tool with masks to create more precise blurring effects. First, select the object you want to blur and go to the “Object” menu. Choose “Clipping Mask” and select the shape or path you want to use as a mask. Then, apply the blur effect as mentioned earlier. The blurring effect will be confined to the areas within the mask, allowing you to control where the blur is applied.
5. Tips and Tricks:
Here are some additional tips and tricks for using the Blurring Tool in Adobe Illustrator:
– Experiment with different blur settings and types to achieve the desired effect.
– Use the Gradient Tool to create gradient fills and apply the blur effect on them.
– Place your blurred objects on separate layers to easily edit and adjust the blurring effect.
– Combine the Blurring Tool with other tools like the Brush Tool or the Blend Tool to create unique and interesting effects.
With these tools and techniques at your disposal, you can create stunning illustrations with beautiful and captivating blurring effects. Practice and explore to discover new ways to enhance your artwork with the Blurring Tool in Adobe Illustrator.
Step-by-step guide to using the Blurring Tool
The Blurring Tool in Adobe Illustrator is a powerful feature that allows you to create a soft and blurry effect on your vector artwork, images, or shapes. Whether you want to add a gradient background, blend different elements together, or create a feather-like effect, the Blurring Tool can help you achieve the desired result. Here is a step-by-step guide on how to use this tool effectively:
1. Open Adobe Illustrator and import the artwork or image you want to edit. Make sure that your file is in a vector format for best results.
2. Select the object or objects you want to apply the blur effect to. You can use the Selection Tool (V) to select multiple objects or the Direct Selection Tool (A) to select individual points or paths within an object.
3. Go to the toolbar on the left side of the screen and click on the “Blur” tool. It looks like a teardrop-shaped icon with a small arrow next to it.
4. With the Blurring Tool selected, you can adjust the brush size and opacity settings in the toolbar at the top of the screen. A larger brush size will create a wider blur effect, while a lower opacity setting will make the blur more transparent.
5. Click and drag your mouse over the object(s) to apply the blur effect. You can preview the effect in real-time as you drag the cursor.
6. If you want to apply a blur effect to a specific area of your artwork, you can use a shape or a mask. Create a shape or a mask using the Shape Tool (M) or the Pen Tool (P), and then select both the shape/mask and the object(s) you want to blur. Right-click and choose “Make Clipping Mask” to apply the blur effect only to the selected area.
7. To fine-tune the blurring effect, you can use the Blur options in the Control panel at the top of the screen. Here, you can adjust the blur radius, blur center, and other settings to achieve the desired result.
8. If you want to remove the blur effect or make adjustments to it, simply select the object(s) and click on the “No Blur” icon in the Control panel. This will revert the object to its original state.
9. Remember to experiment with different settings, brush sizes, and opacity levels to achieve the desired blurring effect. You can also try combining the Blurring Tool with other tools and effects in Adobe Illustrator to create unique and interesting effects.
10. Finally, don’t forget to save your work and export it in the desired format once you are satisfied with the blurring effect.
Using the Blurring Tool in Adobe Illustrator doesn’t have to be intimidating. With this step-by-step tutorial, you can quickly learn how to add a soft and blurry effect to your artwork, images, or shapes. Follow these tips and tricks to make the most out of the Blurring Tool and take your designs to the next level.
What is the Blurring Tool in Adobe Illustrator?
The Blurring Tool in Adobe Illustrator is a tool that allows you to apply a blur effect to objects or elements in your artwork. It helps to create depth, soften edges, and add a sense of movement to your illustrations.
How do I access the Blurring Tool in Adobe Illustrator?
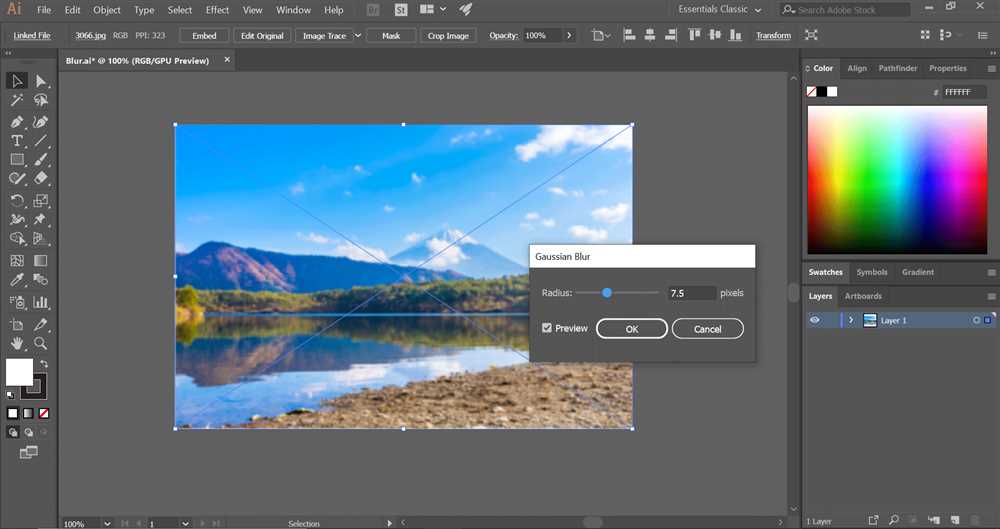
To access the Blurring Tool in Adobe Illustrator, you can select an object or element in your artwork and go to the “Effect” menu, then choose “Blur” and select “Gaussian Blur” from the drop-down menu. You can also use the shortcut Command + Shift + B (Mac) or Ctrl + Shift + B (Windows) to access the tool.
Can I adjust the intensity of the blur effect?
Yes, you can adjust the intensity of the blur effect applied by the Blurring Tool in Adobe Illustrator. After selecting the object or element you want to blur, you can go to the “Effect” menu, choose “Blur,” and then adjust the “Radius” value in the Gaussian Blur dialog box. A higher value will create a more intense blur effect, while a lower value will create a softer blur effect.
Are there any other types of blur effects available in Adobe Illustrator?
Yes, besides the Gaussian Blur, Adobe Illustrator also offers other types of blur effects such as the Motion Blur and the Radial Blur. The Motion Blur adds a sense of movement to objects or elements, while the Radial Blur creates a circular blur effect. You can access these blur effects under the “Effect” menu in Adobe Illustrator.


+ There are no comments
Add yours