


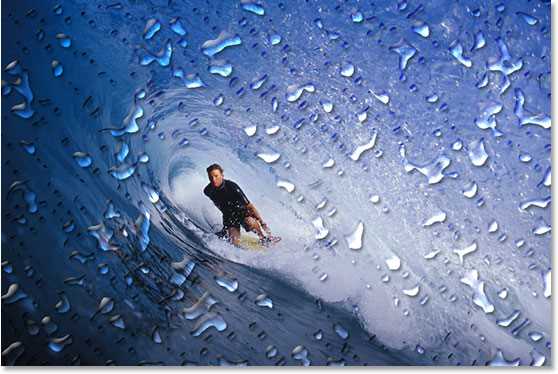
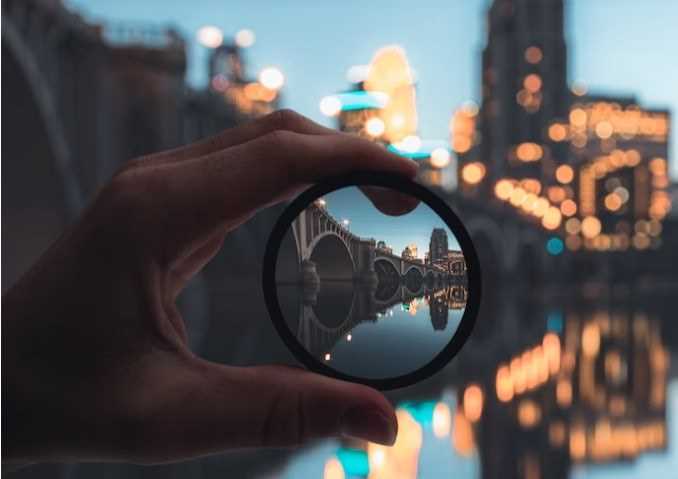
Photography is an art form that allows us to capture the world around us with our lens. One popular technique that professional photographers often strive to achieve is the perfect blur drops effect. This effect adds a sense of movement and dynamism to photos, creating a captivating visual experience for viewers.
To achieve the perfect blur drops effect, it is important to understand the technical aspects of photography. The speed at which the lens captures the image, the aperture, the ISO, and the shutter speed all play a crucial role in creating the desired effect. The interplay between light, focus, and composition must be carefully considered.
First, choose a camera with manual settings to have full control over the exposure and depth of field. Set the camera to a low ISO to minimize noise and maximize image quality. Use a lens with a wide aperture to create a shallow depth of field, allowing only the subject to be in focus while everything else blurs into a beautiful background.
Understanding the Basics
When it comes to achieving the perfect blur drops effect in your photos, understanding the basics of photography is crucial. Having a good grasp of exposure, aperture, ISO, zoom, shutter speed, and composition is essential to achieving the desired effect.
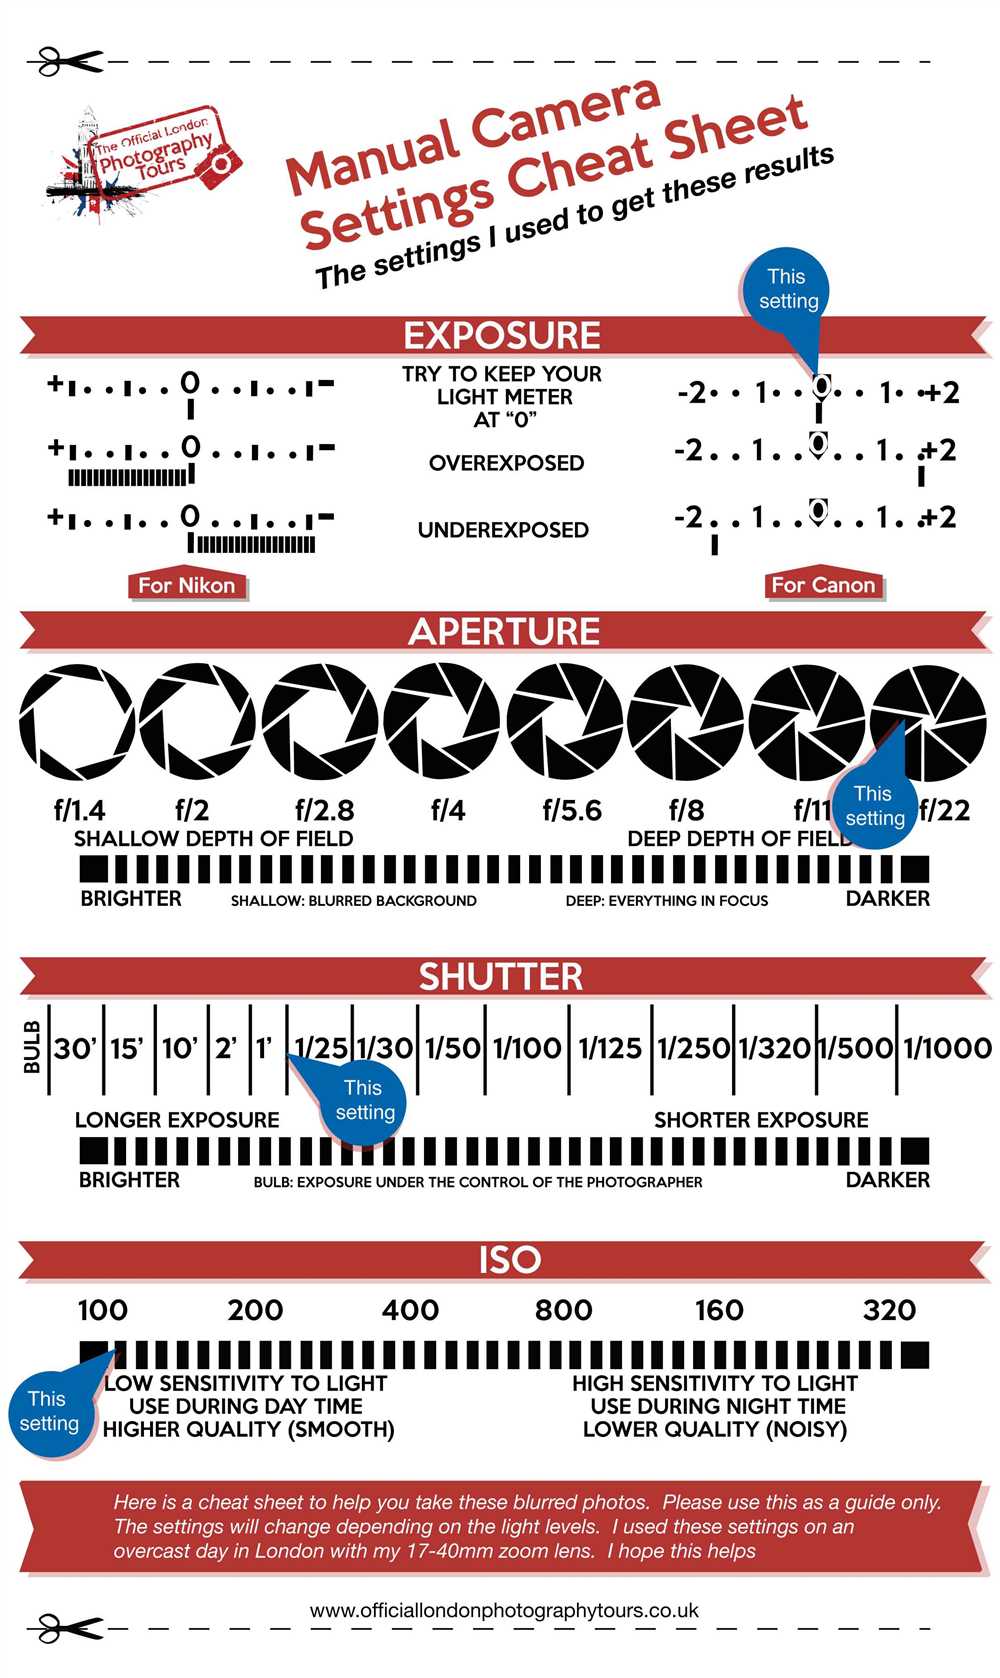
Exposure is the amount of light that enters the camera’s sensor, and it can be adjusted by changing the aperture, ISO, and shutter speed settings. The aperture determines the depth of field, or how much of the image is in focus. A wider aperture (lower f-number) will create a shallower depth of field, while a smaller aperture (higher f-number) will result in a greater depth of field.
ISO refers to the camera’s sensitivity to light. Increasing the ISO can help you capture more light in low-light situations, but it can also introduce noise into the image. It’s important to strike a balance between capturing enough light and maintaining image quality.
Zooming in or out can also affect the blur drops effect. Zooming in can compress the foreground and background, making it easier to create a bokeh effect. On the other hand, zooming out can provide a wider view and allow for more elements to be included in the composition.
The shutter speed determines how long the camera’s sensor is exposed to light. A slower shutter speed can create motion blur and enhance the blur drops effect, particularly when capturing moving subjects. However, using a faster shutter speed may be necessary to freeze fast-moving drops in mid-air.
In addition to capturing the perfect blur drops effect in-camera, editing techniques and post-processing can also play a significant role. Adjusting the contrast, saturation, and sharpness can enhance the effect, while adding filters can help create a specific mood or atmosphere in the photo.
Ultimately, achieving the perfect blur drops effect requires a combination of mastering the technical aspects of camera settings and developing a keen eye for composition and subject placement. With practice and experimentation, you can capture professional-looking photos with the desired depth and blur drops effect.
Learning about Aperture
Aperture is one of the key settings in photography that can greatly affect the exposure and depth of field in your photos. It refers to the size of the opening in the lens that allows light to enter the camera. Understanding how to control aperture is essential for achieving the perfect blur drops effect in your photos.
Aperture is measured in f-stops, such as f/2.8, f/5.6, or f/11. The lower the f-stop number, the wider the aperture and the more light that is allowed into the camera. This can result in a shallower depth of field, where the subject is in focus while the background and foreground are blurred, creating a professional and artistic effect.
When using a wide aperture, such as f/2.8, the background is more likely to be completely blurred, making the subject the clear focus of the image. On the other hand, a narrow aperture, such as f/11, allows more of the background to be in focus, creating a sharper overall image.
Aperture is closely related to shutter speed and ISO settings. The three settings work together to determine the amount of light that reaches the camera’s sensor. A faster shutter speed can be used with a wider aperture to achieve the desired exposure, while a slower shutter speed may be needed with a narrower aperture to allow enough light into the camera.
In addition to controlling exposure and depth of field, aperture can also affect the quality of the bokeh in your photos. Bokeh refers to the out-of-focus areas in an image, and a wider aperture can produce a smoother and more pleasing bokeh effect.
It’s important to note that aperture is primarily controlled by the camera’s lens, rather than the camera itself. Different lenses have different maximum aperture settings, so it’s worth considering this when choosing a lens for achieving the perfect blur drops effect.
Understanding how to use aperture effectively can greatly enhance your photography. Experimenting with different aperture settings can help you achieve the desired composition and create stunning photos that stand out. Additionally, using post-processing techniques, such as applying filters or adjusting the aperture settings in editing software, can further enhance and refine the blur drops effect in your photos.
Exploring Shutter Speed

Shutter speed is an important aspect of photography that affects the overall look and feel of your photos, especially when it comes to achieving the perfect blur drops effect. It refers to the length of time that the camera’s shutter is open, allowing light to enter and expose the image sensor.
One of the main reasons why photographers experiment with different shutter speed settings is to control the amount of motion blur in a photo. Fast shutter speeds freeze motion and create sharp images, while slower shutter speeds create a blur or a dragging effect, particularly when capturing moving subjects.
In the context of achieving the perfect blur drops effect, experimenting with slower shutter speeds is key. By setting the shutter speed to a slow setting, you allow more time for the camera to capture the movement of water droplets or any other subject you are photographing.
When using a slow shutter speed, it’s crucial to maintain a steady hand or use a tripod to prevent camera shake, as any movement could result in unwanted blur in the entire image. Moreover, it’s crucial to find the right balance between a slow shutter speed and the desired level of blur and focus in your composition.
To create the perfect blur drops effect, you can also consider combining a slow shutter speed with other techniques such as zooming or panning. Zooming can create a dynamic effect where the subject is sharp in the center and the surroundings gradually blur out. Panning refers to tracking a moving subject while keeping it in focus, creating a sense of motion with the rest of the image blurred.
Additionally, using the appropriate aperture settings, such as a wide aperture (low f-number), can help achieve a shallow depth of field and enhance the bokeh effect, where the background is blurred and the subject is in sharp focus.
Post-processing can further enhance the blur drops effect in your photos. You can use professional editing software to adjust the exposure, brightness, and contrast of your image. You can also add filters or adjust the colors to create a more dramatic or artistic look.
Experimenting with different shutter speed settings, combined with other techniques and post-processing effects, can help you achieve the perfect blur drops effect in your photos. It allows you to capture the beauty of moving water droplets and create visually stunning images that stand out.
Experimenting with ISO
ISO is an essential camera setting to experiment with when trying to achieve the perfect blur drops effect in your photos. ISO determines the sensitivity of your camera’s image sensor to light. By adjusting the ISO settings, you can control the amount of light that reaches the sensor, which can significantly impact the quality and composition of your photos.
When photographing blur drops, it’s vital to understand how ISO interacts with other camera settings, such as aperture and shutter speed. A higher ISO setting increases the camera’s sensitivity to light, allowing you to use a faster shutter speed and smaller aperture to capture the perfect blur drops effect. This technique helps maintain focus on the foreground subject while creating a beautiful blurred background and bokeh effect.
Experimenting with ISO and finding the right balance is crucial. Higher ISO settings allow for faster shutter speeds, which is advantageous when photographing moving subjects, such as falling water drops. However, using a high ISO can also introduce unwanted noise or graininess to your photos. It’s essential to find the ideal ISO setting that achieves the desired effect while maintaining image quality.
In addition to finding the right ISO setting, post-processing and editing techniques can also enhance the blur drops effect in your photos. Adjusting the exposure, contrast, and sharpness can help bring out the details in both the foreground subject and the blurred background. Additionally, specific editing techniques, such as applying a Gaussian blur to the background, can further emphasize the depth and blur effect.
As a professional photographer, it’s essential to master the ISO settings and understand how they impact your photography. By experimenting with different ISO settings and combining them with proper aperture, shutter speed, and post-processing techniques, you can create stunning photos that achieve the perfect blur drops effect. So grab your camera, lens, and zoom in on your subject, and start exploring the endless possibilities with ISO.
Choosing the Right Equipment

When it comes to achieving the perfect blur drops effect in your photos, choosing the right equipment is crucial. By having the right tools, you can capture stunning images with beautiful bokeh and a sense of depth.
The first consideration is the camera itself. A professional-quality camera will give you better control over settings such as exposure, shutter speed, and ISO. Look for a camera that has a fast autofocus and a high-resolution sensor to ensure sharp, detailed images.
In addition to the camera, the lens you choose also plays a significant role in achieving the desired effect. A lens with a wide aperture, such as f/1.8 or larger, will allow more light into the camera and result in a shallower depth of field. This will create a beautiful background blur, making the drops or any other subject stand out against the foreground.
Another consideration is the use of filters. Using a neutral density (ND) filter can help decrease the amount of light entering the camera, allowing you to use slower shutter speeds while maintaining proper exposure. This can result in soft and smooth blur drops.
When it comes to camera settings, there are a few key factors to keep in mind. For the perfect blur drops effect, try using a wide aperture, a fast shutter speed, and a low ISO. A wide aperture will create a shallow depth of field, while a fast shutter speed will freeze any movement and avoid blurriness. Using a low ISO setting will produce images with low noise levels and higher image quality.
Finally, achieving the perfect blur drops effect requires some post-processing techniques. Editing software such as Adobe Photoshop or Lightroom can help you enhance the blur effect and make the drops more pronounced. You can fine-tune the bokeh and adjust the overall contrast, saturation, and brightness to achieve the desired result. Experiment with different editing techniques to find the look that best suits your style and vision.
By choosing the right equipment, understanding the necessary camera settings, and applying post-processing techniques, you can achieve the perfect blur drops effect in your photos. With practice and patience, you can capture stunning images that have a professional and artistic touch.
Selecting a DSLR Camera
When it comes to achieving the perfect blur drops effect in your photos, having a DSLR camera becomes essential. DSLR cameras give you full control over your photography, allowing you to adjust various settings to capture the desired effect.
One of the key factors in achieving the perfect blur drops effect is selecting the right camera for the job. DSLR cameras come with a range of features and specifications that can greatly impact your ability to achieve the desired effect.
The first thing to consider is the camera’s sensor size. A larger sensor will generally produce better image quality, allowing you to capture more detail and create a more pronounced blur effect. Additionally, a larger sensor can enhance the depth of field, adding a sense of three-dimensionality to your photos.
The lens is another crucial component in achieving the perfect blur drops effect. Selecting a lens with a wide maximum aperture, such as f/1.8 or f/1.4, will allow you to achieve a shallow depth of field and create a beautiful bokeh effect. Additionally, consider using prime lenses as they tend to produce sharper images compared to zoom lenses.
ISO and shutter speed are also important settings to consider. A higher ISO can help you capture more light in darker situations, while a fast shutter speed can freeze the motion of the foreground subject and the blur drops. Balancing these settings with the aperture will allow you to achieve the desired blurred effect while maintaining a well-exposed image.
Please note that achieving the perfect blur drops effect involves more than just the camera settings. Composition, lighting, and post-processing techniques also play crucial roles in capturing stunning photos. Consider using filters to enhance the colors and contrast in your images, and experiment with different techniques during the editing process to create the desired effect.
| Key Points |
|---|
| Select a DSLR camera with a larger sensor size for better image quality and depth of field. |
| Use a lens with a wide maximum aperture to achieve a shallow depth of field and bokeh effect. |
| Balance ISO, shutter speed, and aperture settings to capture the perfect blur drops effect. |
| Consider composition, lighting, and post-processing techniques in addition to camera settings. |
| Experiment with different filters and editing techniques to enhance the desired effect. |
By selecting the right DSLR camera and mastering the necessary techniques, you can capture stunning photos with the perfect blur drops effect. Whether you are a professional photographer or a hobbyist, investing in a high-quality camera and honing your skills can take your photography to the next level.
Investing in a Macro Lens
A macro lens is a valuable investment for achieving the perfect blur drops effect in your photos. This specialized lens is designed to allow you to capture extreme close-up shots with exceptional detail and clarity. When it comes to shooting drops, the ability to get up close and personal with your subject is crucial.
In addition to capturing detailed images, a macro lens also plays a role in the post-processing stage. With a macro lens, you can achieve a shallow depth of field, which allows you to easily separate the drops from the background. This creates a pleasing blur effect that draws attention to the drops themselves.
When using a macro lens for drops photography, composition is key. By carefully arranging the drops and their placement in relation to other elements in the frame, you can create a captivating image. Consider the use of foreground and background elements to enhance the overall composition.
It is important to note that using a macro lens requires some technical know-how. Understanding ISO settings, exposure, shutter speed, and aperture are essential for achieving the perfect blur drops effect. Experiment with different settings to find the right combination to achieve the desired effect.
One technique that professionals often employ when shooting drops is using a high-speed camera. This allows for capturing drops in mid-air, frozen in time. The fast shutter speed will help to freeze the motion of the drops and create a sharp image.
Filters can also be used with a macro lens to enhance the effect of the drops. A neutral density filter can be used to reduce the amount of light entering the lens, allowing for longer exposure times. This can create a silky smoothness in the drops and add to the overall aesthetic appeal.
Lastly, a macro lens gives you the ability to achieve beautiful bokeh in your photos. Bokeh refers to the aesthetic quality of the out-of-focus areas in an image. With a macro lens, you can create a creamy, dreamy bokeh effect that adds an artistic touch to your photos.
Investing in a macro lens is a wise decision for any photographer interested in mastering the art of capturing drops. With its ability to capture detail, composition, and enhance the blur effect, a macro lens is an essential tool for achieving the perfect blur drops effect in your photography.
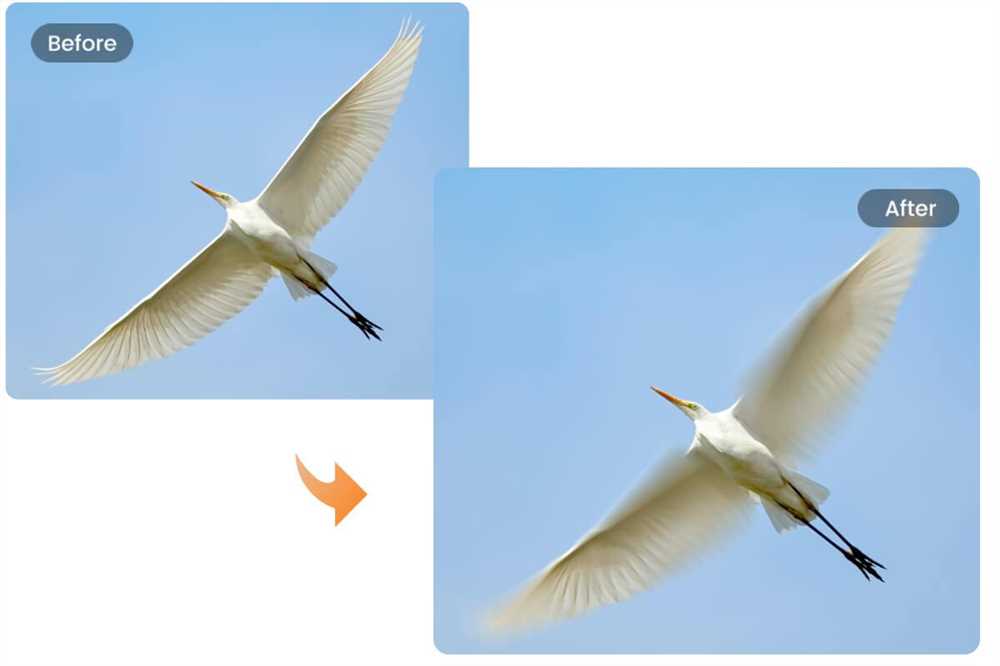
What is the blur drops effect in photography?
The blur drops effect in photography is a technique where you create a blurred background with drops of water in the foreground. It gives a dreamy and ethereal look to the photo.
How can I achieve the perfect blur drops effect in my photos?
To achieve the perfect blur drops effect, you will need a spray bottle filled with water, a macro lens or a lens with a wide aperture, and a subject with water droplets. Set your camera to a low aperture setting, around f/2.8 or lower, and focus on the droplets. Spray a fine mist of water while taking the photo to capture the droplets in motion and create a beautiful bokeh background.
Can I achieve the blur drops effect with a smartphone camera?
Yes, you can achieve the blur drops effect with a smartphone camera. The key is to use an app or a camera feature that allows you to manually adjust the aperture or blur effect. Make sure to focus on the water droplets and use a spray bottle to create a mist while taking the photo.
Are there any post-processing techniques to enhance the blur drops effect?
Yes, there are post-processing techniques you can use to enhance the blur drops effect. You can increase the contrast and saturation to make the colors pop. You can also add a vignette effect to draw attention to the subject and create a more dramatic look. Experiment with different editing tools and adjustments to achieve the desired result.


+ There are no comments
Add yours