


In the digital age, creating stunning visual effects and captivating art has become easier than ever before. With the advent of innovative tools and techniques, artists and designers are able to push the boundaries of creativity and blur the lines between reality and fiction. One such example is the creation of Blurnick, a mesmerizing piece of artwork that showcases the power of digital manipulation and the skillful use of various tools.
The process of creating Blurnick involves a combination of techniques that are meticulously applied to achieve the desired effect. The artists behind Blurnick utilize a range of tools and software to manipulate colors, shapes, and textures. By employing these techniques, they are able to create a subtle blur that adds depth and intrigue to the artwork.
One of the key tools used in creating Blurnick is image editing software. This powerful software allows artists to manipulate and enhance images, applying various filters and effects to achieve a specific aesthetic. By carefully selecting and adjusting the settings, artists are able to create the unique blurring effect that characterizes Blurnick.
Additionally, artists utilize techniques such as layering and blending to further enhance the visual impact of Blurnick. By layering different elements and blending them together, artists are able to create a harmonious composition that captivates the viewer’s eye. This technique not only adds depth to the artwork but also helps to create a sense of movement and dynamism.
In conclusion, the creation of Blurnick is a testament to the power of digital manipulation and the skillful use of various tools and techniques. By carefully analyzing the methods employed in its creation, we gain a deeper appreciation for the artistry and innovation behind this mesmerizing artwork. Blurnick serves as a reminder of the endless possibilities that exist in the world of digital art and the limitless potential of human creativity.
Techniques
BlurNick is a popular tool used in image editing to create a blur effect. It offers several techniques that can be used to manipulate and enhance images. The blur effect is achieved by applying various filters and adjustments to the image, resulting in a softened and less defined appearance.
In order to create the blur effect, a variety of tools are used. One common technique is the use of a blur filter, which is applied to the image to create a subtle or dramatic blur effect. Other tools that can be used include the smudge tool, which can be used to blend and blur areas of an image, and the brush tool, which can be used to paint on a blur effect.
When analyzing the techniques used in creating blur, it is important to consider the desired outcome and the level of blur that is desired. Different tools and techniques may be used depending on the specific requirements of the image and the desired effect. Some techniques may involve creating a shallow depth of field, where only a specific area of the image is in focus, while other techniques may involve creating a more overall blurred effect.
Overall, the techniques used in creating blur are an essential part of the image editing process. They allow for the manipulation and enhancement of images, resulting in unique and visually appealing effects. By analyzing the techniques used, one can gain a deeper understanding of how blur effects are created and how they can be applied creatively in image editing.
Image Blurring
When analyzing the techniques used in creating Blurnick, it is clear that image blurring plays a significant role in achieving the desired effect. Blurring is a common technique in image processing used to reduce noise, highlight specific areas, or add a sense of depth to an image.
There are various tools and algorithms that can be used to apply blur effects to images. One widely used technique is Gaussian blur, which applies a Gaussian distribution to blur pixels based on their proximity to neighboring pixels. This creates a smooth transition between colors and reduces the visibility of sharp edges.
In addition to Gaussian blur, other techniques such as motion blur and box blur can be used to achieve different blur effects. Motion blur simulates the effect of movement by blurring pixels in the direction of motion, while box blur averages the color values of neighboring pixels to create a more uniform blur effect.
When applying blur effects, the intensity or radius of the blur can be adjusted to control the amount of blurring applied to an image. This allows for fine-tuning and customization of the desired effect.
The tools used in creating Blurnick may vary depending on the software or programming language used. Some popular tools for applying blur effects include Adobe Photoshop, GIMP, and OpenCV. These tools provide a range of options and settings to apply and adjust blur effects.
Overall, image blurring is an essential technique used in creating Blurnick and other similar projects. By using various blur techniques and tools, developers and designers can achieve the desired aesthetic effect, whether it be a subtle enhancement or a dramatic blur effect that adds a dreamy or abstract quality to an image.
Color Correction

Color correction is an essential step in the process of creating the blur effect in Blurnick. It involves analyzing and adjusting the colors of an image or a video to achieve a desired look or to match the intended mood of a scene. Various techniques and tools are used to achieve accurate and consistent color correction results.
One commonly used technique is called color grading, which involves adjusting the shadows, midtones, and highlights of an image or video to create a specific color palette. This technique can be used to enhance certain colors or to create a stylized or cinematic look.
Another technique used in color correction is color balancing. This involves adjusting the overall color balance of an image or video to ensure that the colors appear natural and accurate. This includes adjusting the white balance, which affects how colors are represented under different lighting conditions.
Color correction can also involve removing or reducing color casts, which are unintentional color tints that occur due to lighting conditions or the use of specific camera settings. This can be done by adjusting the color balance or by using specialized tools like color correction filters.
In the creation of Blurnick, various tools are used for color correction, including professional video editing software such as Adobe Premiere Pro or DaVinci Resolve. These tools provide a wide range of features and controls that allow for precise color adjustments, including the ability to apply color grading effects, adjust color balance, and remove color casts.
The color correction process in Blurnick typically involves analyzing the colors in each frame or shot, making adjustments to achieve the desired look, and then applying the color correction settings to the entire video. This process ensures that the colors in the final output are consistent and visually pleasing.
Depth of Field
In analyzing the techniques used in creating blur in the Blurnick photography app, one important aspect to consider is depth of field. Depth of field refers to the area in an image that is in sharp focus, while the surrounding areas appear blurred. This technique is commonly used in photography to draw attention to the subject and create a sense of depth and dimension.
To achieve depth of field, various tools and techniques can be used. One common technique is adjusting the aperture of the camera lens. By using a wider aperture (such as f/1.8), the depth of field becomes shallower, resulting in a more pronounced blur in the background. On the other hand, using a narrower aperture (such as f/16) increases the depth of field, resulting in a larger area in focus.
Another technique used to create depth of field is the use of selective focus. This technique involves manually focusing on a specific subject, while intentionally blurring the rest of the image. Selective focus can be achieved by adjusting the focus ring on a camera lens or by using software tools in post-processing.
In addition to these techniques, the Blurnick app utilizes advanced algorithms and tools to enhance the depth of field effect. These tools allow users to adjust the amount of blur, the range of the focused area, and other parameters to achieve the desired effect. By combining various techniques and tools, Blurnick provides users with a powerful tool for creating stunning and professional-looking images with a shallow depth of field.
| Techniques | Tools |
|---|---|
| Adjusting aperture | Camera lens |
| Selective focus | Focus ring, software tools |
| Advanced algorithms | Blurnick app |
Tools

In creating Blurnick, a variety of tools and techniques were used to achieve the desired blur effect.
One of the primary tools used was a specialized blurring software that allowed for precise control over the blur intensity and direction. This software was instrumental in creating the unique blur effect that gives Blurnick its distinct style.
In addition to the blurring software, other tools such as graphic design software were used to manipulate and enhance the images. These tools allowed for adjusting the color, contrast, and composition of the images to further enhance the overall blurred effect.
Furthermore, various camera techniques were employed during the shooting process to capture the images in a way that would lend themselves well to the blur effect. Such techniques included intentional camera movement, long exposure times, and selective focus.
Overall, the combination of these tools and techniques played a crucial role in the creation of Blurnick and helped achieve the desired blurred aesthetic that sets it apart.
Photoshop
Photoshop is one of the most commonly used tools in the field of digital image editing. It provides a wide range of techniques and tools that can be used to create various effects, including the popular “blurnick” effect.
One of the key techniques used in Photoshop for creating the blurnick effect is the blur tool. This tool allows the user to selectively blur specific areas of an image, creating a blurred effect that can be adjusted to achieve the desired level of blur.
In addition to the blur tool, other tools such as the brush tool and the smudge tool can also be used to blend and smudge the image, creating a smoother and more seamless transition between the blurred and non-blurred areas.
Another technique that can be used in Photoshop for creating the blurnick effect is the use of layer masks. Layer masks allow the user to selectively apply effects, such as blurring, to specific areas of an image while keeping other areas unaffected. This can be particularly useful when working with complex or detailed images.
Overall, Photoshop offers a wide range of tools and techniques that can be used to create the blurnick effect. By analyzing the specific tools and techniques used in the creation of blurnick, it is possible to gain a deeper understanding of how this popular effect is achieved.
What is “Blurnick” and what is it used for?
“Blurnick” is a software tool used for creating blur effects in images. It is mainly used by photographers and graphic designers to add a creative and artistic touch to their photos. The tool offers various techniques and tools to adjust the intensity and size of the blur, allowing users to achieve the desired effect.
Can you explain the techniques used in “Blurnick” for creating blur effects?
Yes, “Blurnick” utilizes several techniques to create blur effects in images. One of the main techniques is the Gaussian blur, which applies a weighted average to pixels in order to create a smooth and blurred appearance. Another technique is the motion blur, which simulates the effect of movement by applying a directional blur. The tool also offers a selective blur technique, which allows users to apply blur to specific areas of an image while keeping other parts sharp. These techniques, along with others, give users a wide range of options for creating unique and visually appealing blur effects.
What are the tools provided by “Blurnick” for adjusting the intensity and size of the blur?
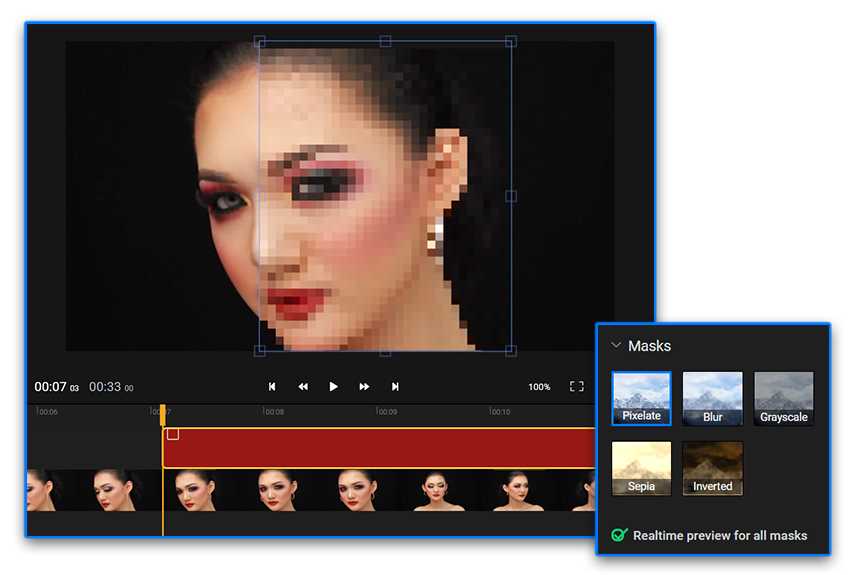
“Blurnick” provides users with various tools to adjust the intensity and size of the blur. One of the main tools is the blur brush, which allows users to selectively paint and apply blur to specific areas of an image. The tool also offers sliders and numerical inputs to adjust the intensity and size of the blur. Additionally, users can use a mask tool to precisely define the areas where the blur should be applied. These tools give users a high level of control and flexibility in achieving the desired blur effect.


+ There are no comments
Add yours