


Welcome to our step-by-step tutorial on installing and configuring Blur.io! In this guide, we will walk you through the process of setting up Blur.io on your system. Whether you are a beginner or an experienced user, this tutorial will help you get started with Blur.io and ensure that you have a seamless installation experience.
Step 1: Installation
The first step in installing Blur.io is to download the installation package from the official website. Simply follow the on-screen instructions and choose the appropriate options for your operating system. Once the download is complete, run the installer and follow the prompts to install Blur.io on your machine.
Step 2: Configuration
After the installation is complete, it’s time to configure Blur.io to meet your specific needs. Open the Blur.io application and navigate to the settings menu. Here, you can customize various options such as the interface, keyboard shortcuts, and audio settings. Take your time to explore the different settings and adjust them according to your preferences.
Note: It’s recommended to refer to the official documentation or consult online resources for a detailed explanation of each setting and its effect on the application.
Step 3: Integration
Once you have completed the configuration process, you may want to integrate Blur.io with other applications or services that you use. Blur.io provides seamless integration with popular platforms such as Slack, Google Drive, and Trello. To integrate Blur.io with another application, simply navigate to the integration settings within Blur.io and follow the instructions provided for your desired integration.
Congratulations! You have successfully installed and configured Blur.io on your system. Now you can enjoy the benefits of this powerful application and take your productivity to new heights. We hope this step-by-step tutorial has been helpful in getting you started with Blur.io. If you have any questions or need further assistance, feel free to consult the official documentation or seek help from the Blur.io community.
What is Blur io?

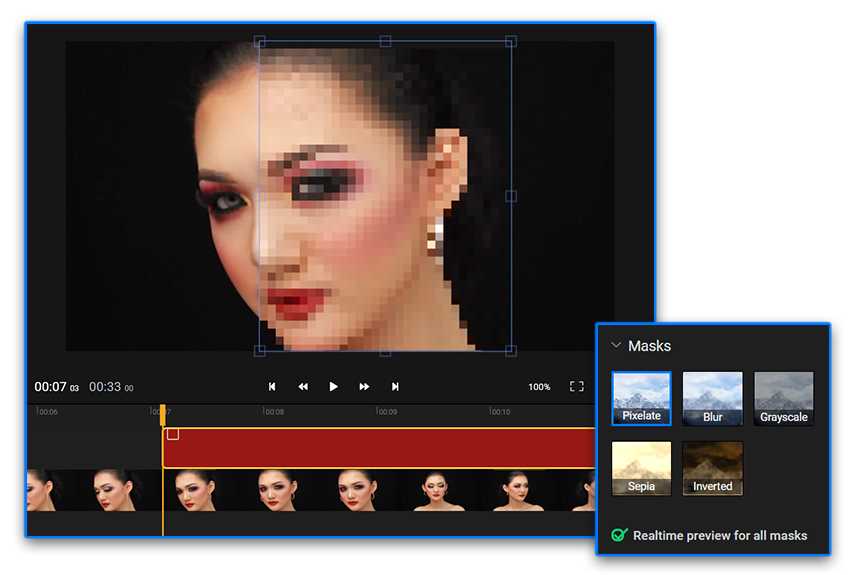
Blur io is a powerful and versatile JavaScript library that allows developers to easily add visual effects and animations to their web applications. It provides a simple and intuitive API for blurring and animating elements on a web page, making it an essential tool for creating dynamic and engaging user interfaces.
With Blur io, you can easily blur any HTML element with just a few lines of code. Whether you want to create a subtle blur effect for a background image or apply a more pronounced blur to a specific section of your website, Blur io provides the flexibility and control you need.
In addition to blurring, Blur io also offers a wide range of animation options. You can animate the blur level of an element, create transitions between different blur states, and even combine blurring with other animations, such as fading or scaling. With these powerful features, you can bring your web designs to life and make them more interactive and engaging.
Installing and configuring Blur io is a straightforward process. In this step-by-step tutorial, we will guide you through the installation process and show you how to configure Blur io to achieve the desired visual effects for your web applications. Get ready to add a touch of magic and dynamism to your websites with Blur io!
Understanding the concept of Blur io

Blur io is a powerful tool that allows you to effortlessly blur images in your web applications. In this tutorial, we will guide you through the process of installing and configuring Blur io step-by-step.
Blur io provides a simple and intuitive solution for applying blur effects to images. With just a few lines of code, you can enhance the visual appeal of your website by adding a professional and polished look to your images.
One of the key benefits of using Blur io is its ease of installation. The installation process is straightforward and can be completed by anyone with basic web development knowledge. Whether you are a beginner or an experienced developer, you can follow this step-by-step tutorial to easily install and configure Blur io.
By the end of this tutorial, you will have a clear understanding of how to install Blur io and configure it to suit your specific needs. You will be able to effortlessly blur images, adjust the intensity of the blur effect, and apply the effect to specific sections of your website.
So, let’s get started with the installation and configuration process of Blur io. Follow the steps outlined in this tutorial to leverage the power of blur effects and enhance the visual appeal of your web applications!
Benefits of using Blur io

Blur io provides a number of benefits for users who want to enhance the privacy and security of their sensitive information. Here are some of the key advantages:
1. Enhanced Privacy: By using Blur io, you can blur and obfuscate personal information such as email addresses, phone numbers, and credit card details. This helps protect your sensitive data from being easily visible or recognizable, reducing the risk of unauthorized access.
2. Anonymity: Blur io allows you to create and manage disposable email addresses, which can be used for various online activities such as signing up for newsletters or registering on websites. This helps protect your real email address from being exposed to spam or unwanted messages.
3. Stop Tracking: Blur io provides built-in tracker blocking and anti-tracking features, which help prevent websites and advertisers from tracking your online activities. This helps maintain your privacy and reduces the amount of targeted ads you see while browsing the web.
4. Password Management: With Blur io, you can easily generate strong, unique passwords for each of your online accounts. The built-in password manager securely stores these passwords, saving you from the hassle of remembering multiple login credentials.
5. Advanced Security: Blur io offers additional security features such as one-click masked phone numbers, masked credit card numbers, and secure browser autofill. These features help protect your personal information from being exposed or compromised during online transactions.
6. User-Friendly Interface: The Blur io installation and configuration process is simple and user-friendly, making it easy for both beginners and advanced users to set up and customize their privacy and security settings. The step-by-step tutorial provided ensures a seamless experience.
In summary, Blur io is a powerful tool that allows users to enhance their privacy, protect their personal information, and improve their online security. By following the tutorial on how to install and configure Blur io step-by-step, you can take advantage of the various benefits it offers.
Prerequisites

Before you can install and configure Blur.io, there are a few prerequisites you need to have in place. Here is a step-by-step guide on what you will need:
1. An understanding of how to install and configure software on your system.
2. A compatible operating system that supports Blur.io. Check the documentation for the specific requirements.
3. A working internet connection to download the necessary files.
4. Basic knowledge of how to navigate the command line interface (CLI) on your system.
5. Familiarity with installing and managing packages using a package manager, such as npm (Node Package Manager).
By ensuring you have these prerequisites in place, you will be ready to proceed with the installation and configuration of Blur.io.
System requirements for Blur io

In order to install and configure Blur io, you will need to make sure that your system meets the following requirements:
- A compatible operating system, such as Windows, macOS, or Linux.
- An internet connection to download the necessary files and updates.
- At least 2GB of RAM to ensure smooth operation of Blur io.
- A processor with at least 1.5GHz clock speed for optimal performance.
- A minimum of 10GB of available storage space on your hard drive.
- Administrative privileges to install and configure Blur io.
By ensuring that your system meets these requirements, you will be able to successfully install and configure Blur io without any issues.
Download and installation of Blur io

In this step-by-step tutorial, we will guide you through the process of installing and configuring Blur io on your system.
Blur io is a powerful tool that allows you to add blur effects to images and videos. It can be used for various purposes, such as enhancing privacy, creating artistic effects, or simply adding a touch of elegance to your content.
To get started with Blur io, follow the steps below:
- Go to the official website of Blur io at https://blur.io.
- Navigate to the Download section of the website.
- Click on the Download button to begin the download process.
Once the download is complete, locate the downloaded file on your system and open it.
Follow the on-screen instructions to install Blur io. Make sure to carefully read and accept the terms and conditions.
After the installation is complete, you can launch Blur io by double-clicking on its icon or accessing it from the Applications menu.
Now that you have successfully installed Blur io on your system, you can proceed to the next steps to configure and start using the tool.
Step-by-Step Installation
Installing and configuring Blur io is a straightforward process that can be completed in just a few simple steps. This tutorial will walk you through the necessary steps to successfully install and configure Blur io on your system.
Step 1: Download the Blur io package from the official website. Make sure to choose the correct version for your operating system.
Step 2: Extract the downloaded package to a directory of your choice.
Step 3: Open a terminal or command prompt and navigate to the directory where you extracted the Blur io package.
Step 4: Run the installation command to install Blur io. The exact command may vary depending on your operating system. Refer to the documentation for your system for the specific command.
Step 5: Once the installation is complete, you can configure Blur io by editing the configuration file. The configuration file is usually located in the installation directory.
Step 6: Open the configuration file in a text editor and modify the necessary settings to suit your needs. The documentation provided with Blur io should contain instructions on how to configure the various options.
Step 7: Save the configuration file and exit the text editor.
Step 8: Restart Blur io to apply the changes. The exact command to restart Blur io may vary depending on your operating system. Refer to the documentation for your system for the specific command.
After completing these steps, you should have successfully installed and configured Blur io on your system. You can now start using Blur io to improve the security and privacy of your online activities.
Installing Blur io on Windows

Follow this step-by-step tutorial to learn how to install and configure Blur io on your Windows operating system.
Question-Answer:
What is Blur io?
Blur io is a software that allows users to apply blur effects to images and videos.


+ There are no comments
Add yours